Touge Tuning's 2015 WRB WRX - Northstar

Voir l'évolution des projets de nos utilisateurs et membres

Modérateur : Modérateurs

Règles du forum
:arrow: UN post par membre par projet
:arrow: Essayez le plus possible d'inscrire un titre representatif comme: nick / voiture / mods principales
:arrow: Voici un exemple parfait d'un journal extrement bien détaillé: http://www.iwsti.com/forums/gd-members- ... 109-a.html" onclick="window.open(this.href);return false;
Avatar de l’utilisateur
Touge Tuning
Rookie
Messages : 56
Inscription : mar. janv. 30, 2007 9:56 pm
Localisation : Toronto

Re: Touge Tuning's 2015 WRB WRX - Northstar

Message par Touge Tuning »

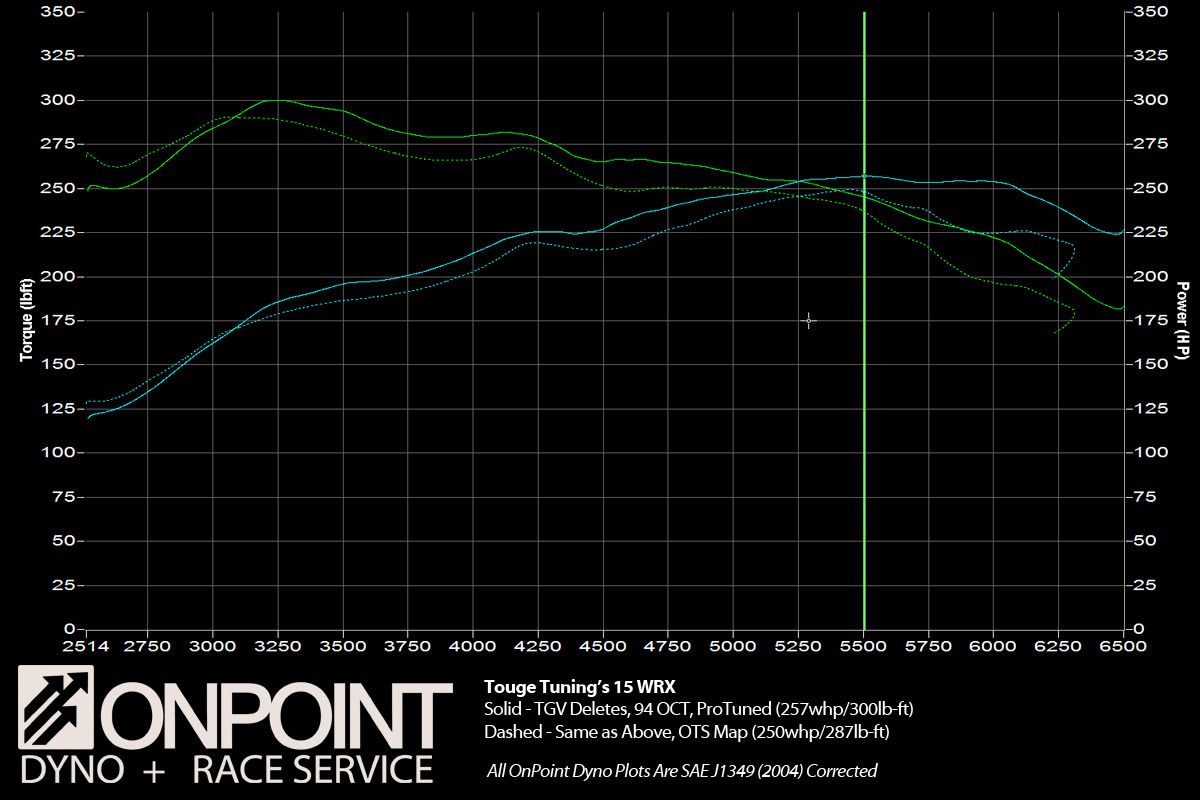
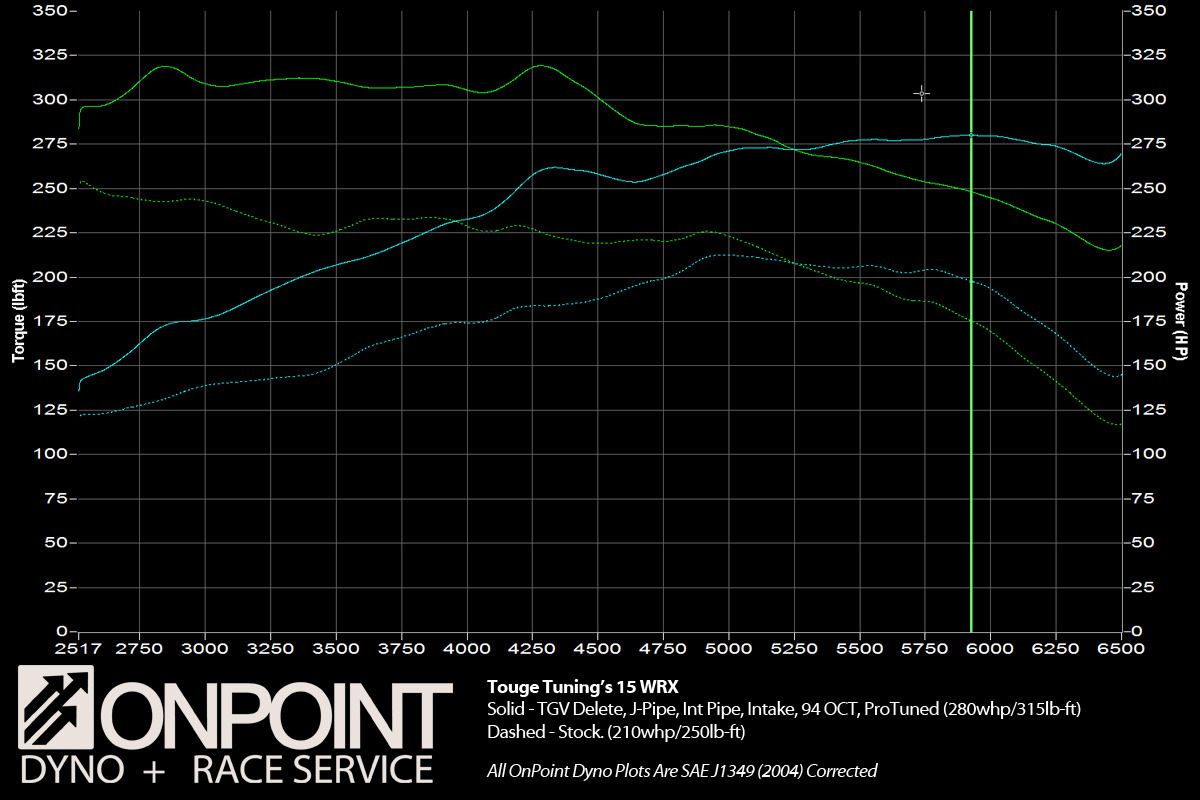
While doing the Initial dyno tuning we also did Turn In Concepts TGV Deletes which were very easy to do. It shouldn't take even an inexperienced person more then 1.5 hours to do these. With the EJ Series the TGV Deletes required full removal of the intake manifold which is a very involved job and was costly. In this case it is very quick and painless to do the TGV's on the FA20DIT. When we first did this in February we ran into an issue where the COBB Pro software was not saving the codes being turned off so we ran the car with the TiC Provided OTS map. After some back and forth with COBB the code issue was resolved and we were able to do a quick tune for the TGV's ony. While there are many skeptics on the internet about these I think the dyno results speak for themselves with this mod. Power and Torque is up pretty much everywhere especially in the upper end as you'd expect. With this mod and custom tuning power went up 21% for horsepower and 20% torque over stock. The TGV alone compared to the custom tune without made gains of 5.7% horsepower and 5.3% torque which is pretty amazing!

Event: Dyno
Location: Touge Tuning, Mississauga Ontario
Ambient Temp: 15C - May 2015
Elevation: 249 ft.
Weather: Warm
Car: 2015 Subaru WRX
Tuner: Sasha from OnPoint Dyno
Dyno Info: Dynapack
Transmission: Stock 6 speed
Gear: 4th
Stage 1 + TGV OTS Peak HP at RPM: 250 @ 5300RPM - SAE J1349 (2004) Corrected
Stage 1 + TGV OTS Peak Torque at RPM: 287 @ 3100RPM - SAE J1349 (2004) Corrected
Stage 1 + TGV Custom Tune Peak HP at RPM: 257 @ 5500RPM - SAE J1349 (2004) Corrected
Stage 1 + TGV Custom Tune Peak Torque at RPM: 300 @ 3250RPM - SAE J1349 (2004) Corrected
Stock Peak HP at RPM: 212 @ 4900RPM - SAE J1349 (2004) Corrected
Stock Peak Torque at RPM: 250 @ 2500RPM - SAE J1349 (2004) Corrected
Baseline HP/TQ for Stock 2010 STi on same dyno: 228WHP/240WTQ
Target Boost: 20PSI Tapering
Fuel: 94 Octane Petro Canada

Mod List
-COBB AccessPORT - Custom Tune
-Turn In Concepts TGV Deletes

Image

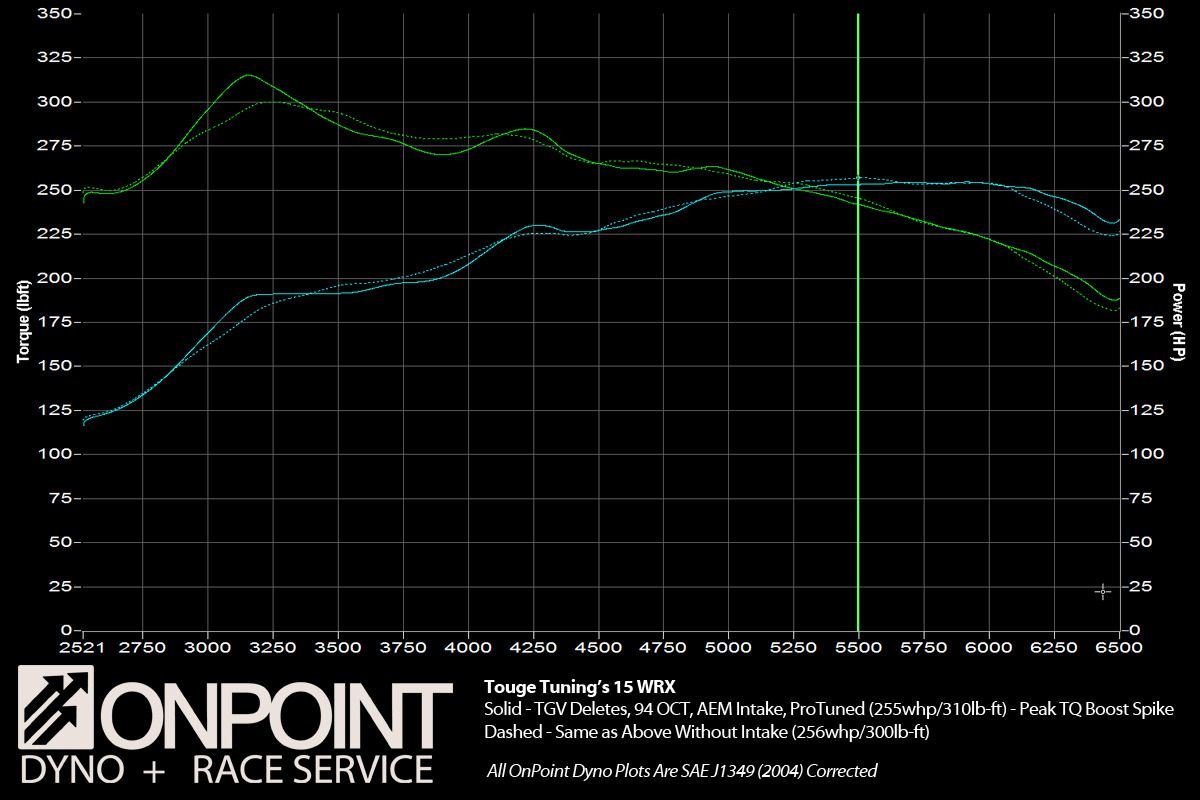
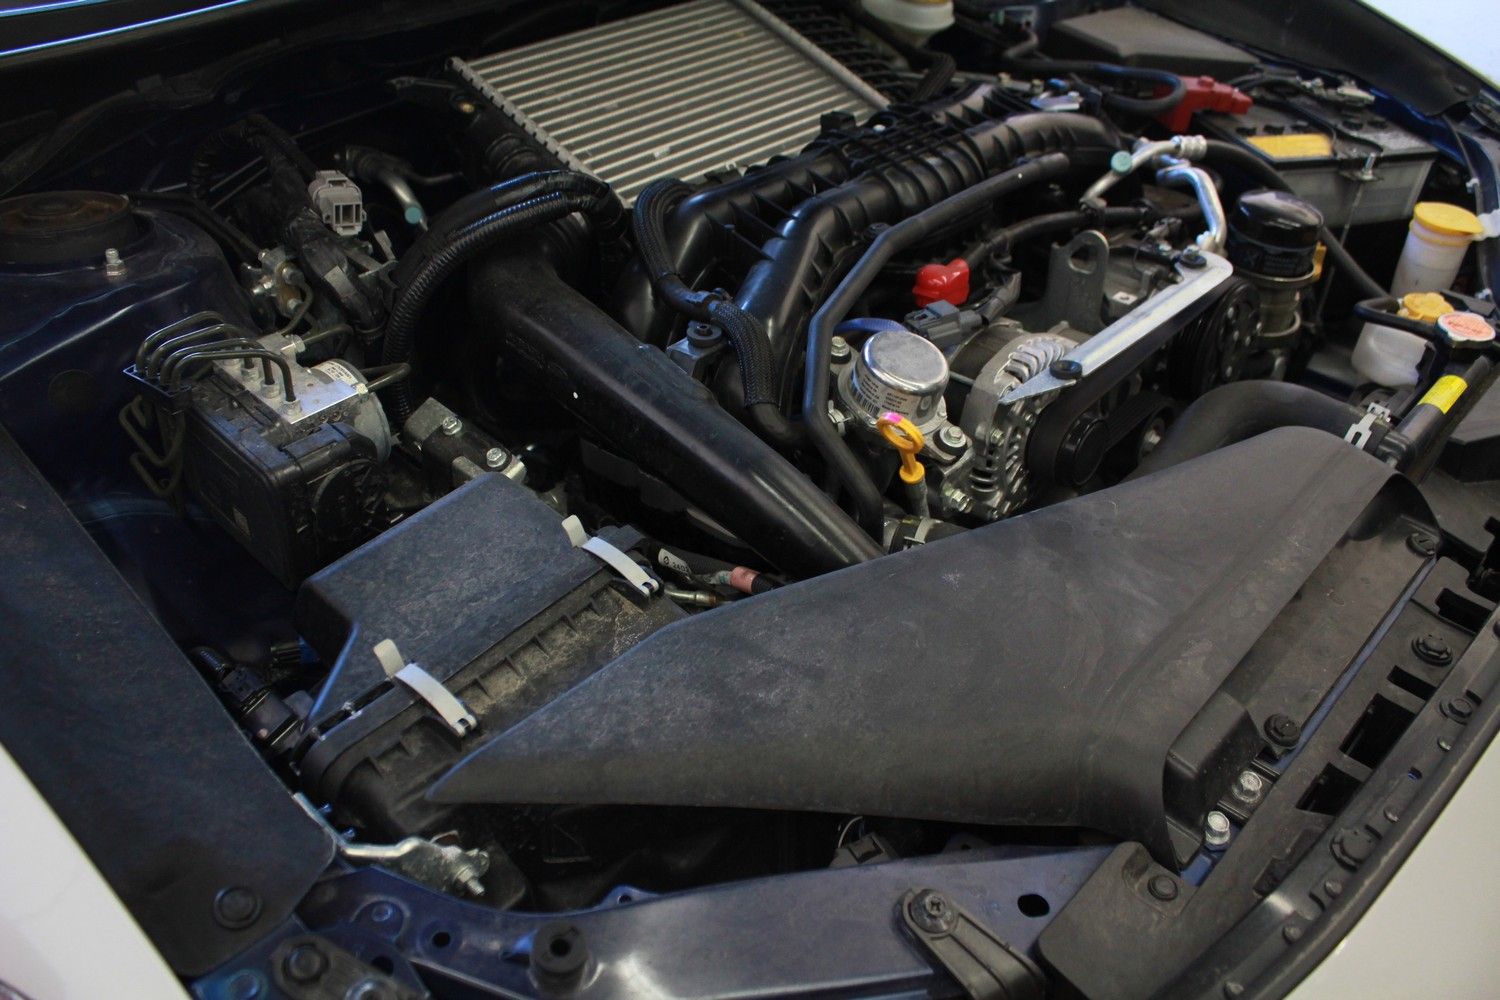
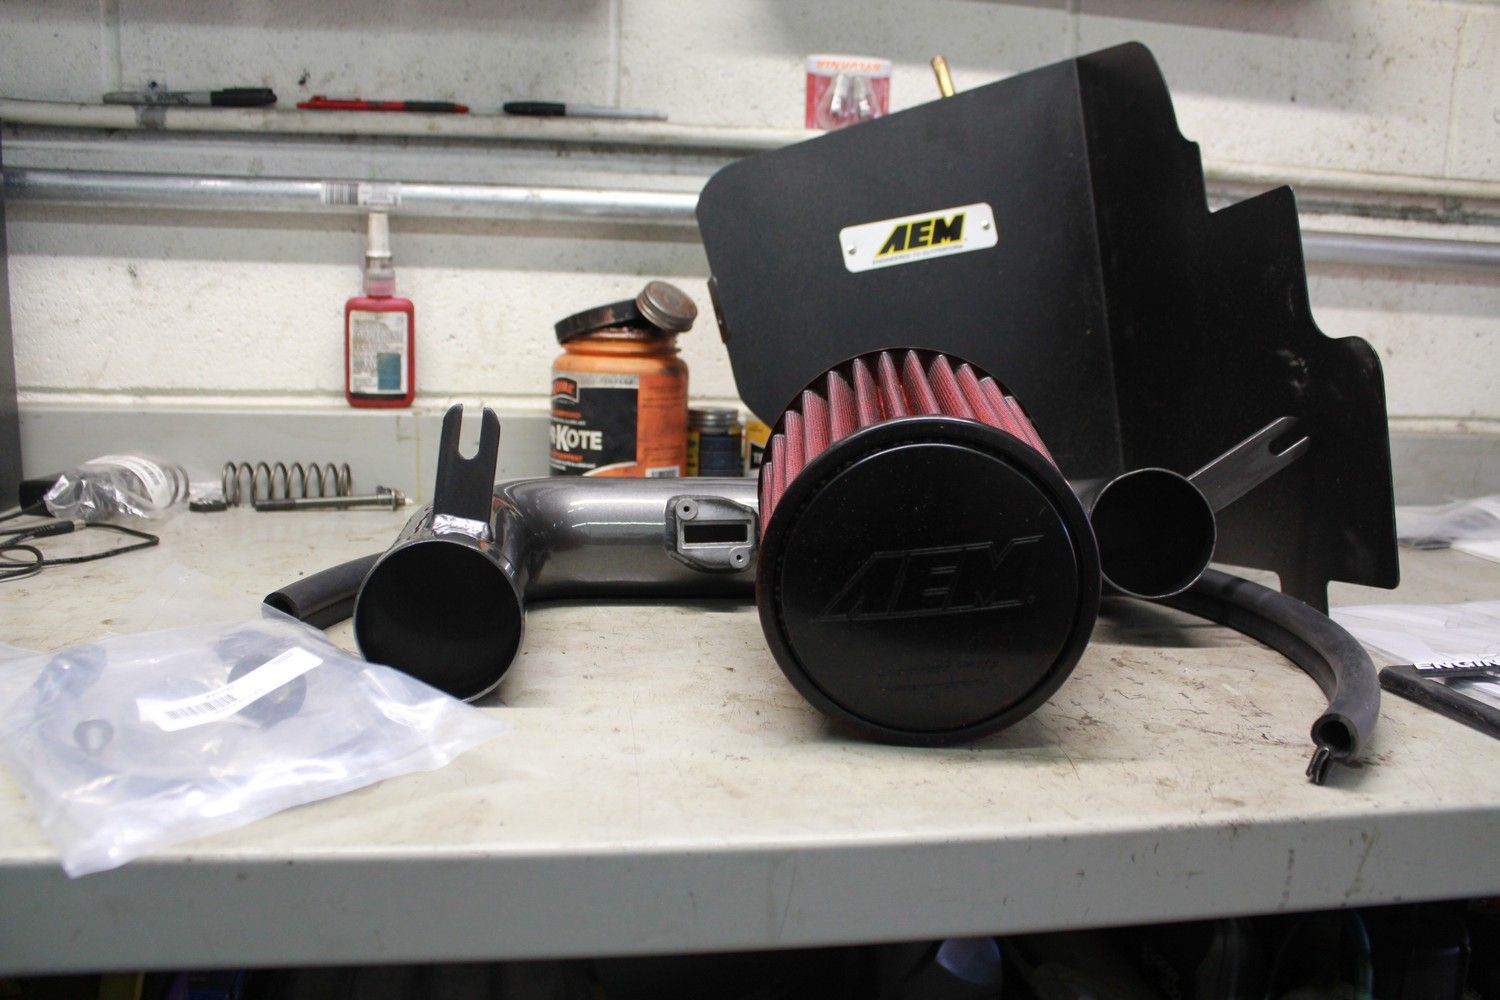
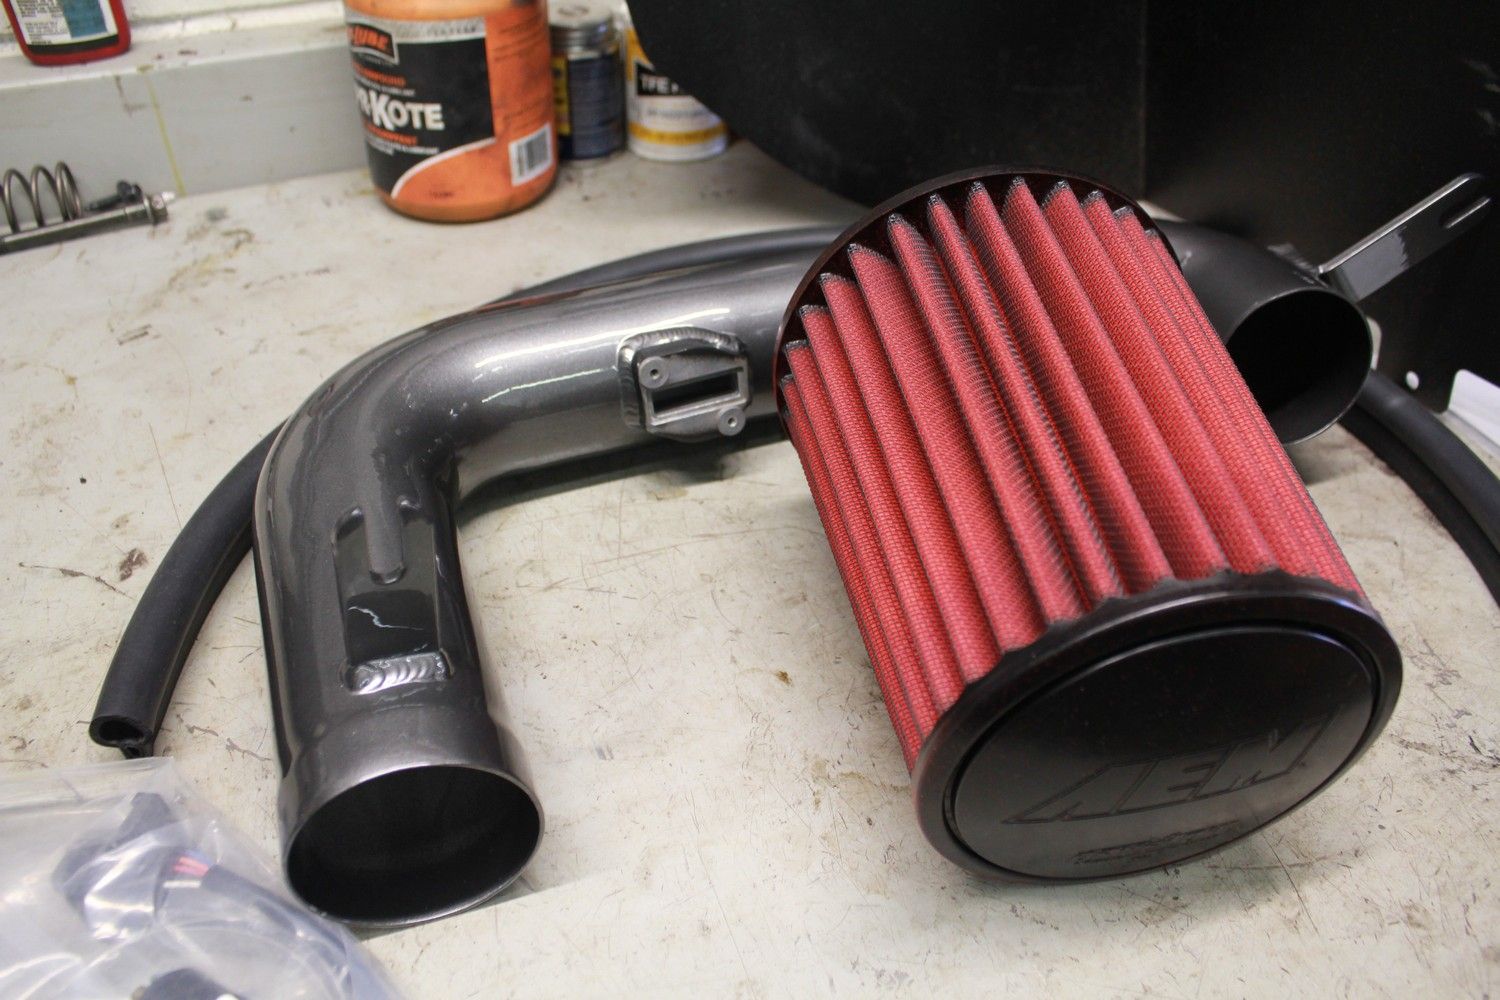
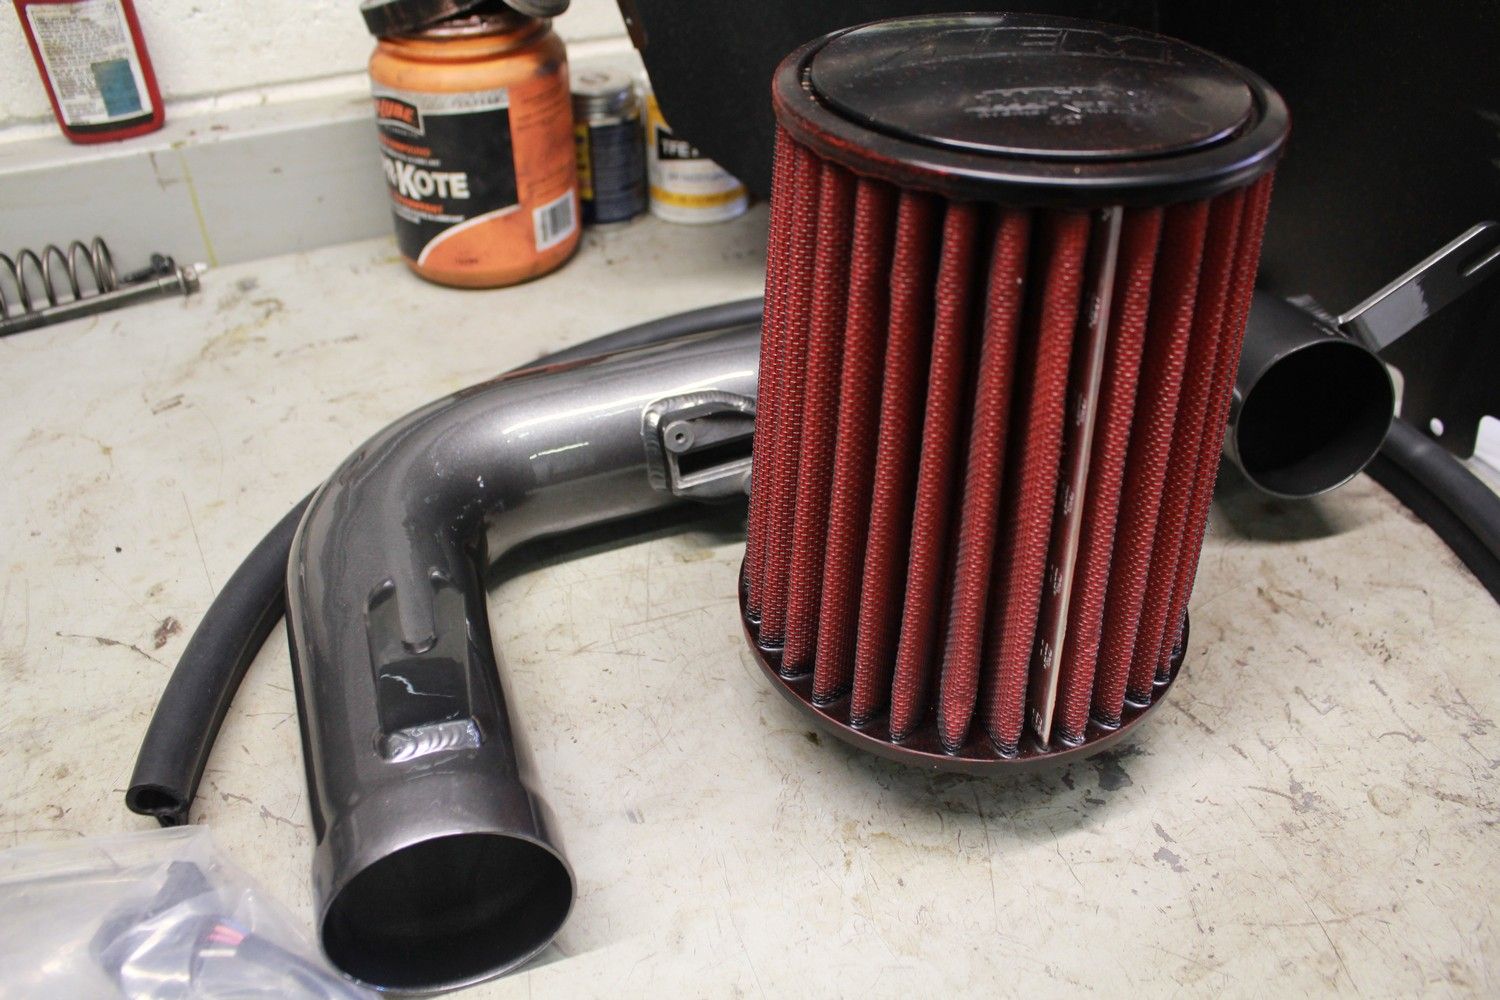
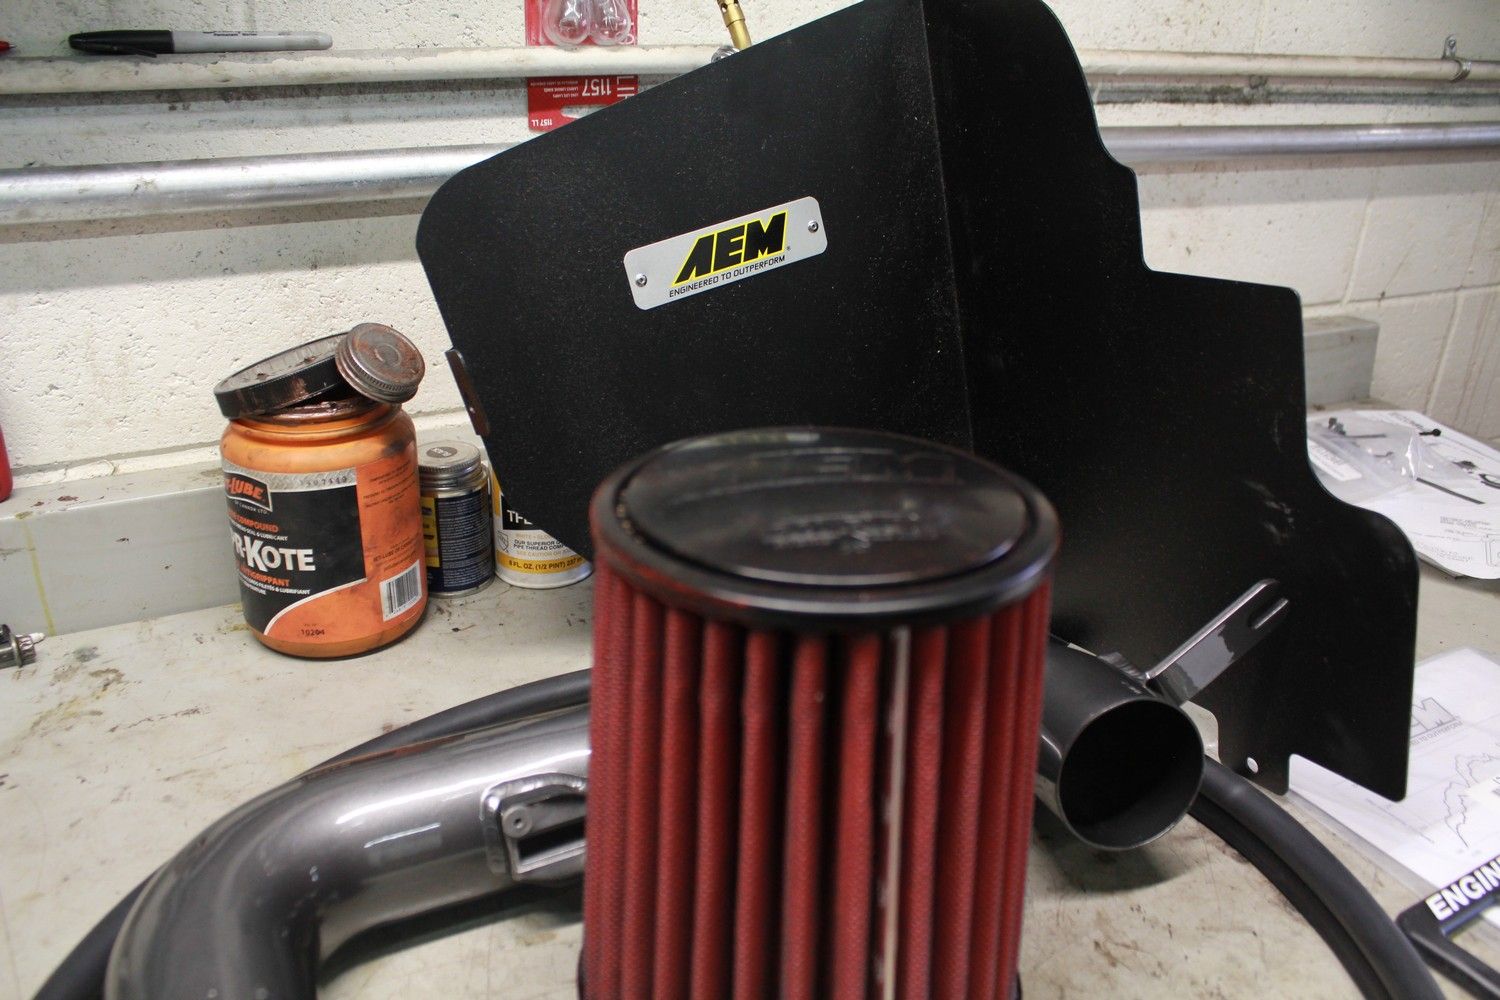
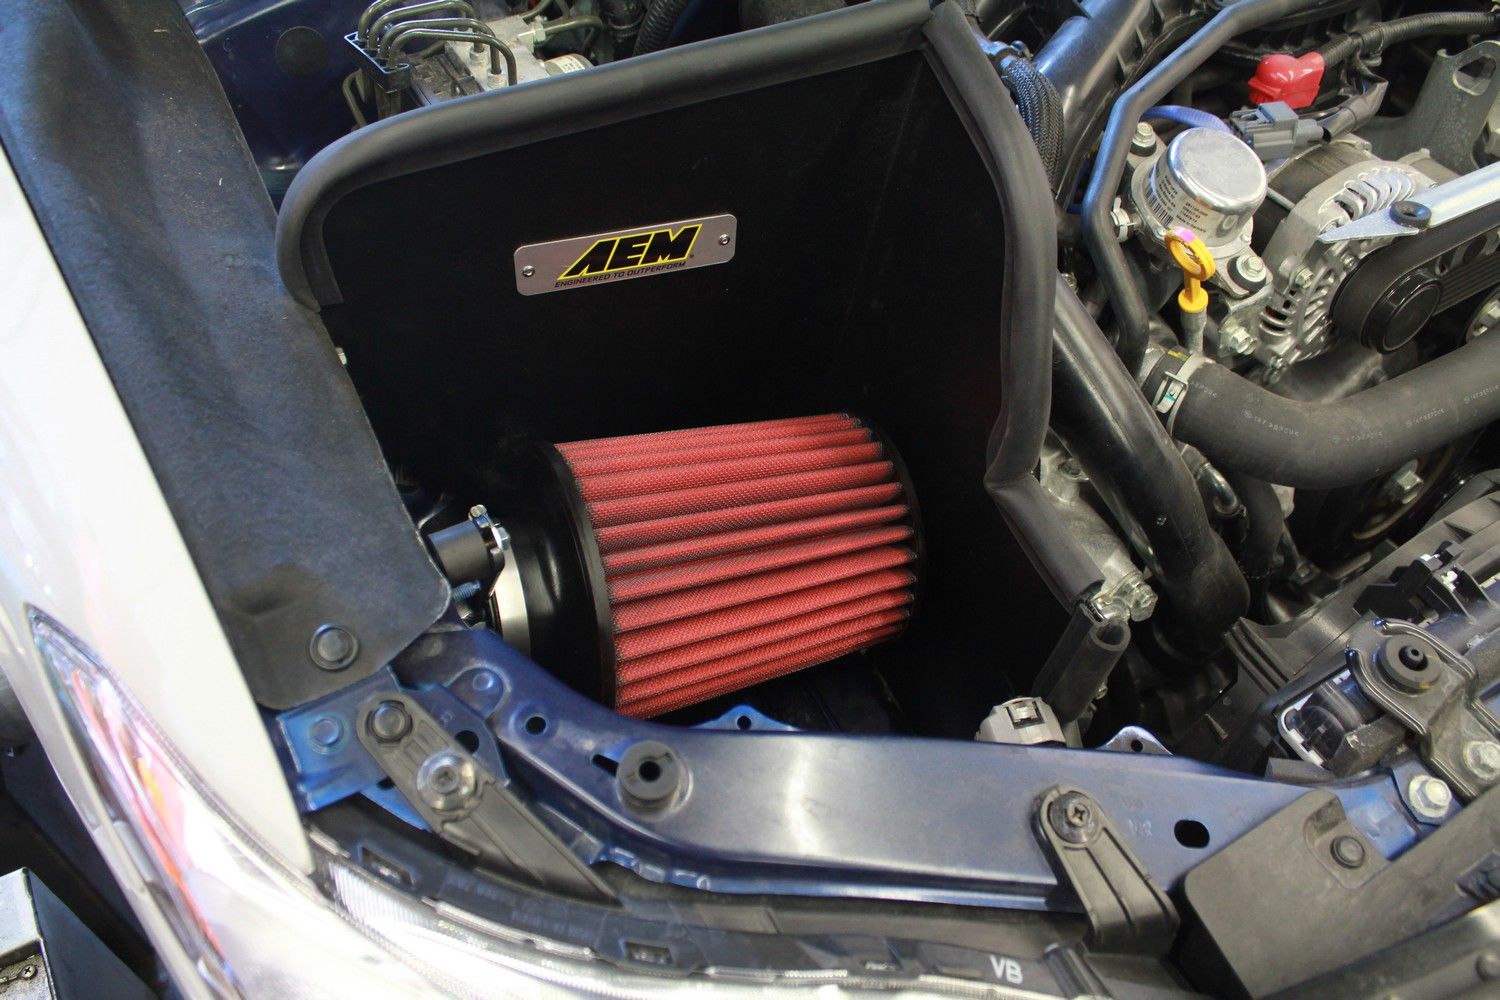
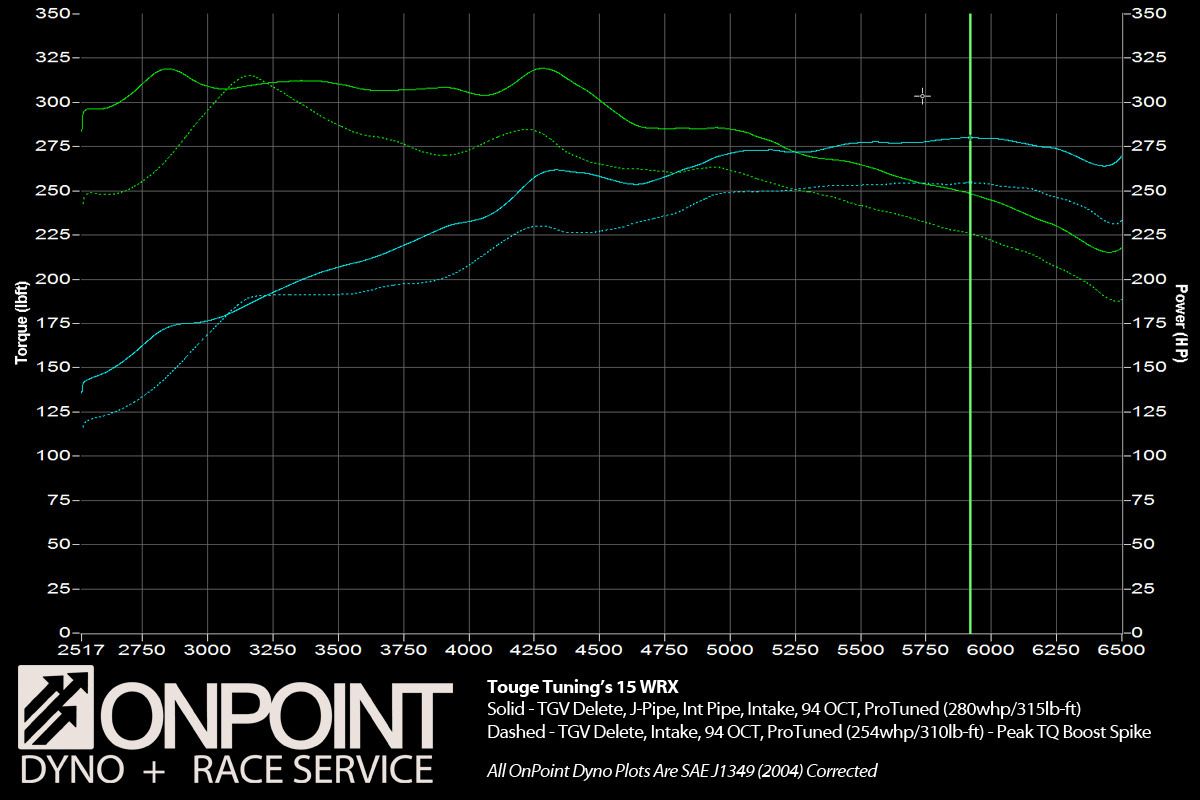
Our next step was to quickly install the AEM Intake System on the car while it was on the dyno. While some will claim to make horsepower our results do show otherwise with the intake in this step. With that said the intake will help once the biggest restriction is removed from the system which is the J-Pipe (2015 Downpipe). Regardless here are the numbers, the boost was all over the place but overall power was not made with this mod in the state the car was. Ah well though, it sounds better and looks better IMO then the factory airbox.

Event: Dyno
Location: Touge Tuning, Mississauga Ontario
Ambient Temp: 15C - May 2015
Elevation: 249 ft.
Weather: Warm
Car: 2015 Subaru WRX
Tuner: Sasha from OnPoint Dyno
Dyno Info: Dynapack
Transmission: Stock 6 speed
Gear: 4th
Stage 1 + TGV + AEM Intake Custom Tune Peak HP at RPM: 257 @ 5300RPM - SAE J1349 (2004) Corrected
Stage 1 + TGV + AEM Intake Custom Tune Peak Torque at RPM: 300 @ 3100RPM - SAE J1349 (2004) Corrected
Stock Peak HP at RPM: 212 @ 4900RPM - SAE J1349 (2004) Corrected
Stock Peak Torque at RPM: 250 @ 2500RPM - SAE J1349 (2004) Corrected
Baseline HP/TQ for Stock 2010 STi on same dyno: 228WHP/240WTQ
Target Boost: 20PSI Tapering
Fuel: 94 Octane Petro Canada

Mod List
-COBB AccessPORT - Custom Tune
-Turn In Concepts TGV Deletes
-AEM Intake


Image

Image
Image
Image
Image
Image
Image
Image
Image

To be continued...
Chris - Sales@tougetuning.com - P.905.405.0682
Tues-Fri 12-8pm, Sun. 12-8pm - 996 Westport Cres Unit 2
www.TougeTuning.com - Follow us on Facebook

Cobb|DBA|Hawk|Powerslot|Ferodo|Whiteline|Grimmspeed|TiC|Kartboy|Invidia|Swift|Motul|Rally Armor|ACT|Blouch|Injector Dynamics|Deatschwerks
Avatar de l’utilisateur
Touge Tuning
Rookie
Messages : 56
Inscription : mar. janv. 30, 2007 9:56 pm
Localisation : Toronto

Re: Touge Tuning's 2015 WRB WRX - Northstar

Message par Touge Tuning »

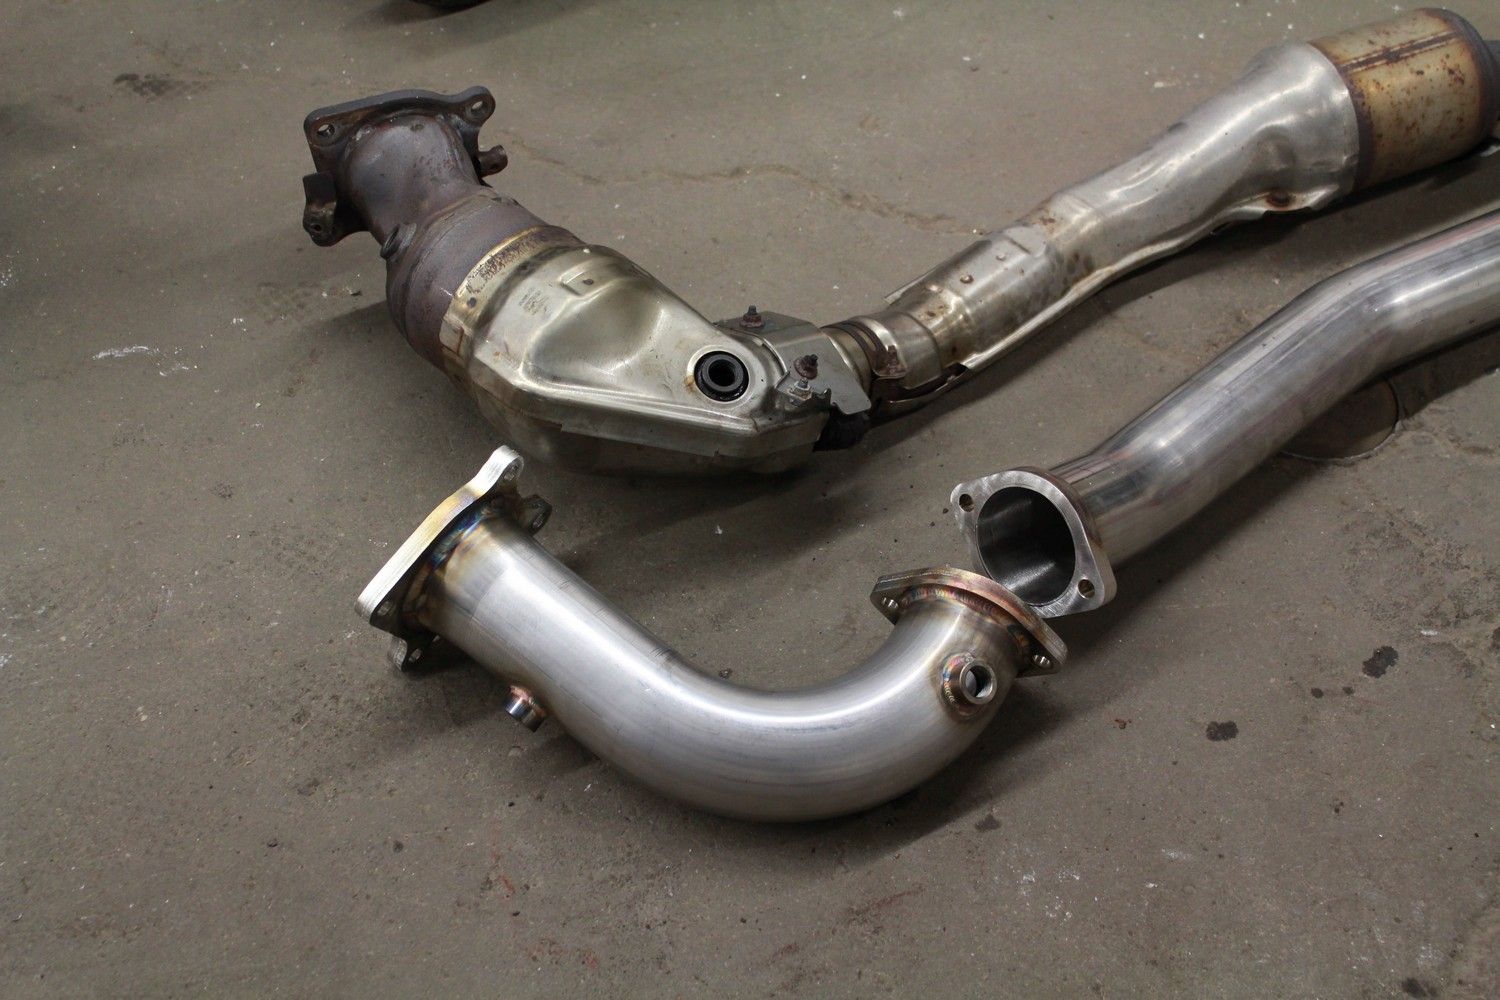
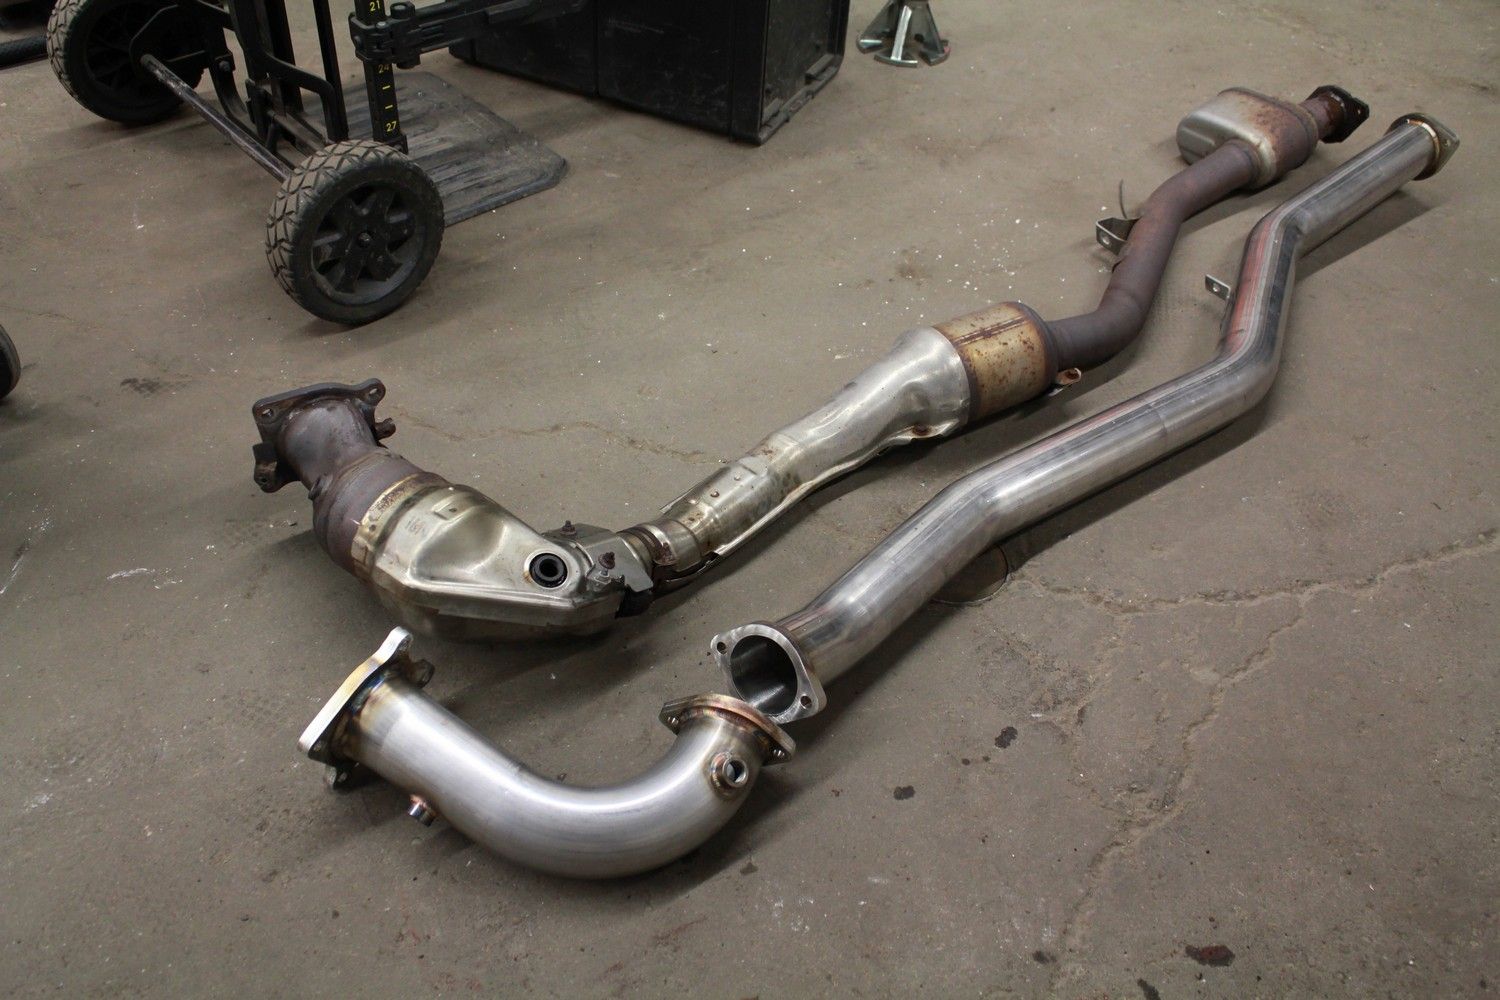
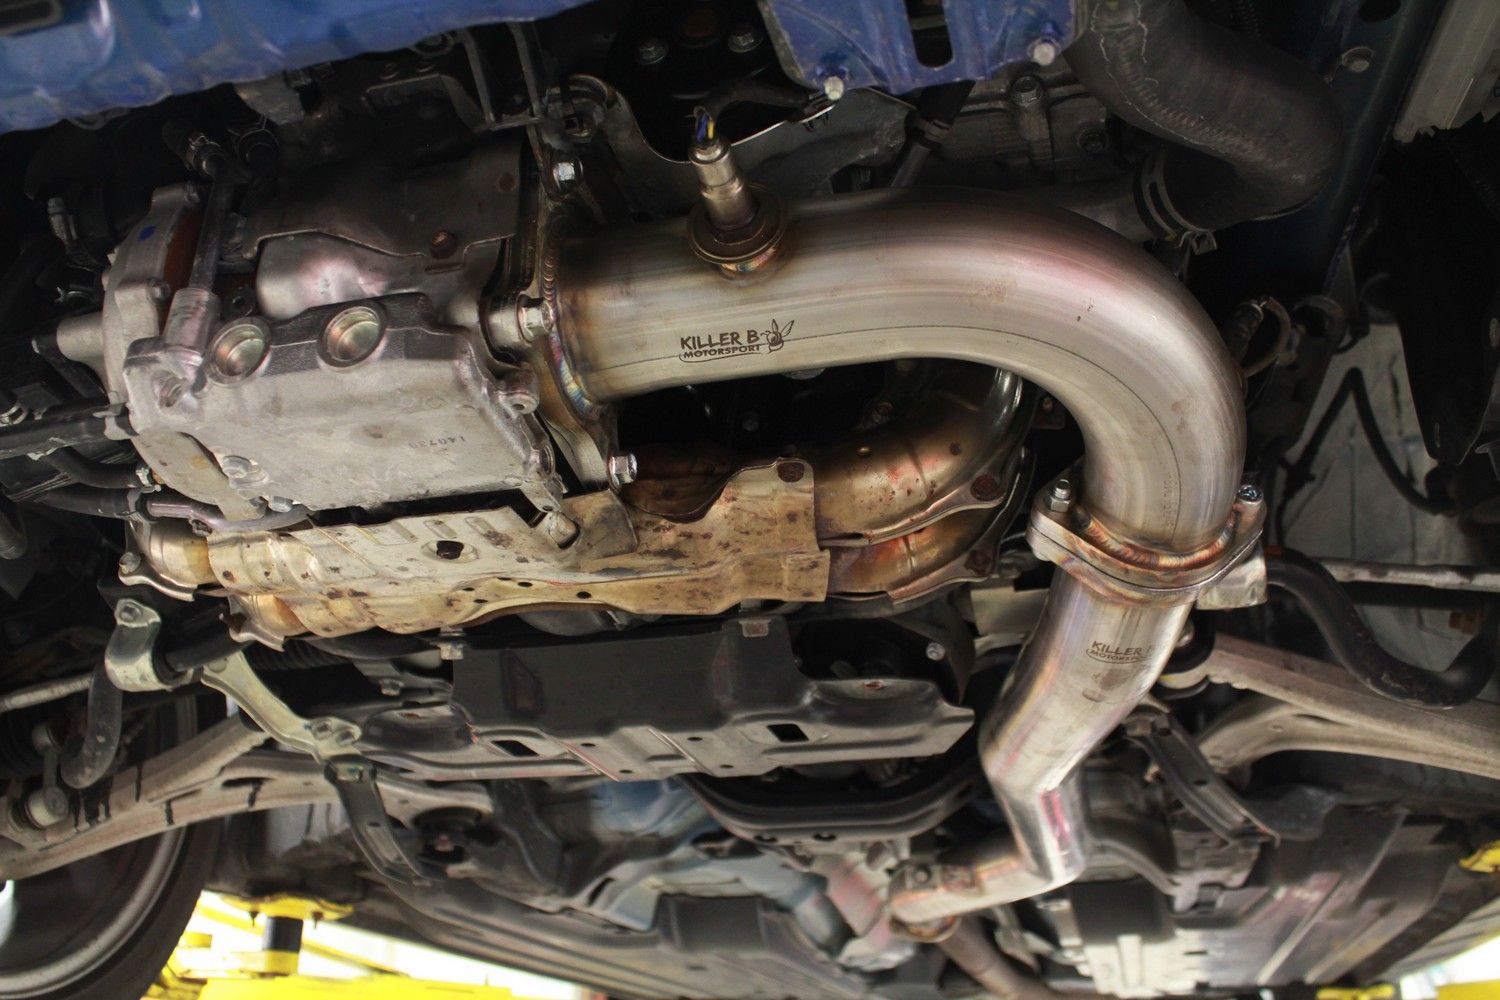
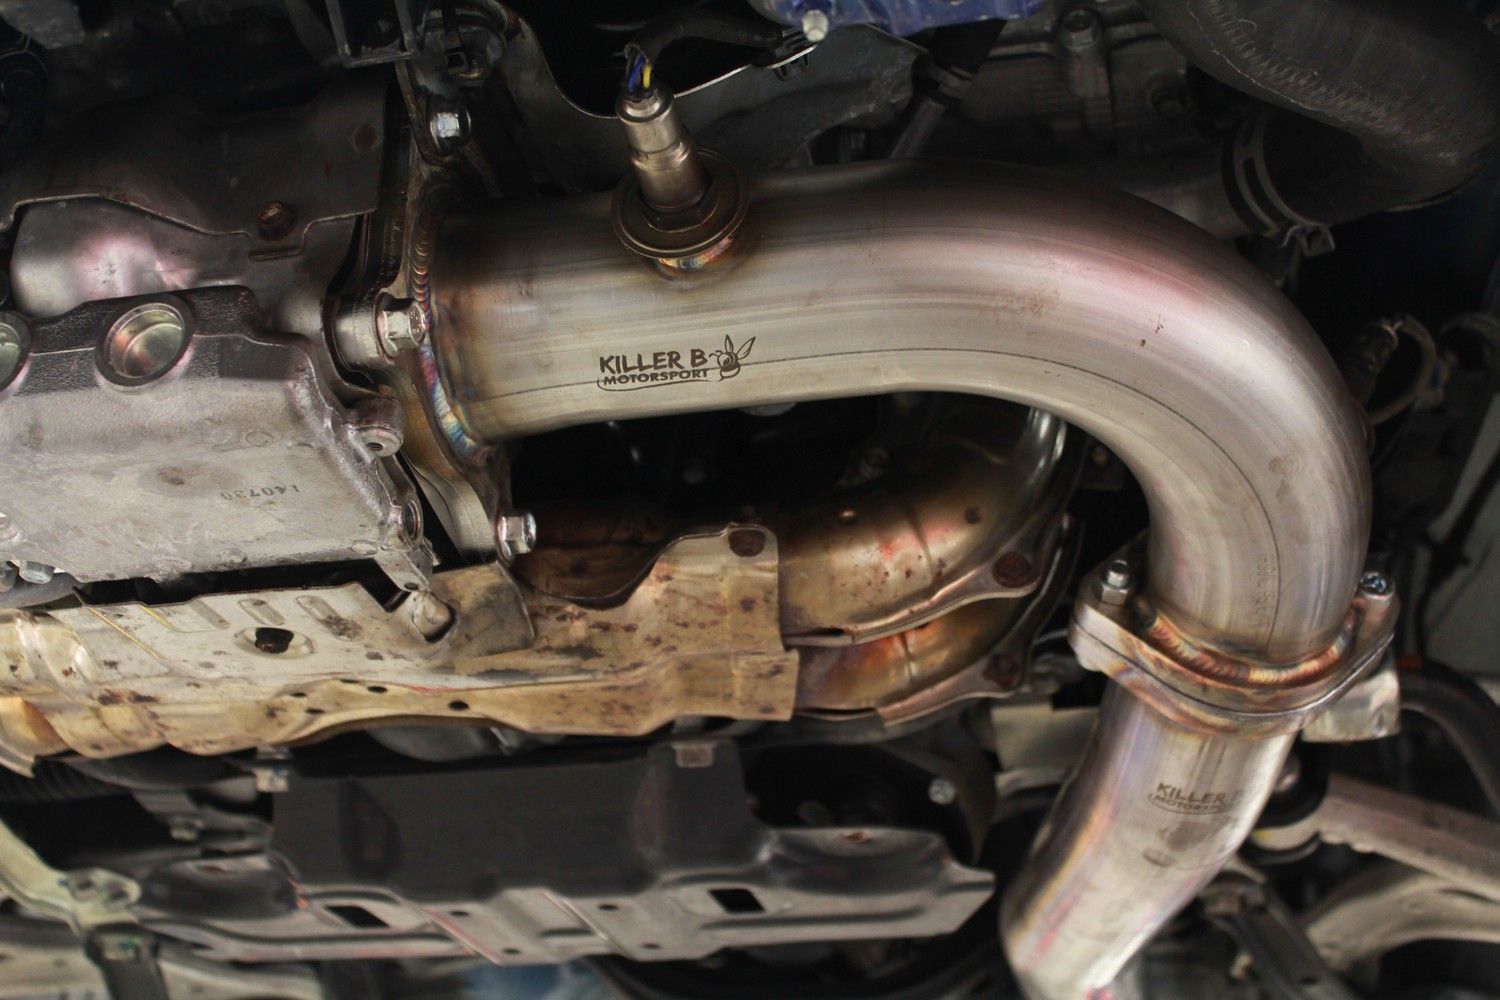
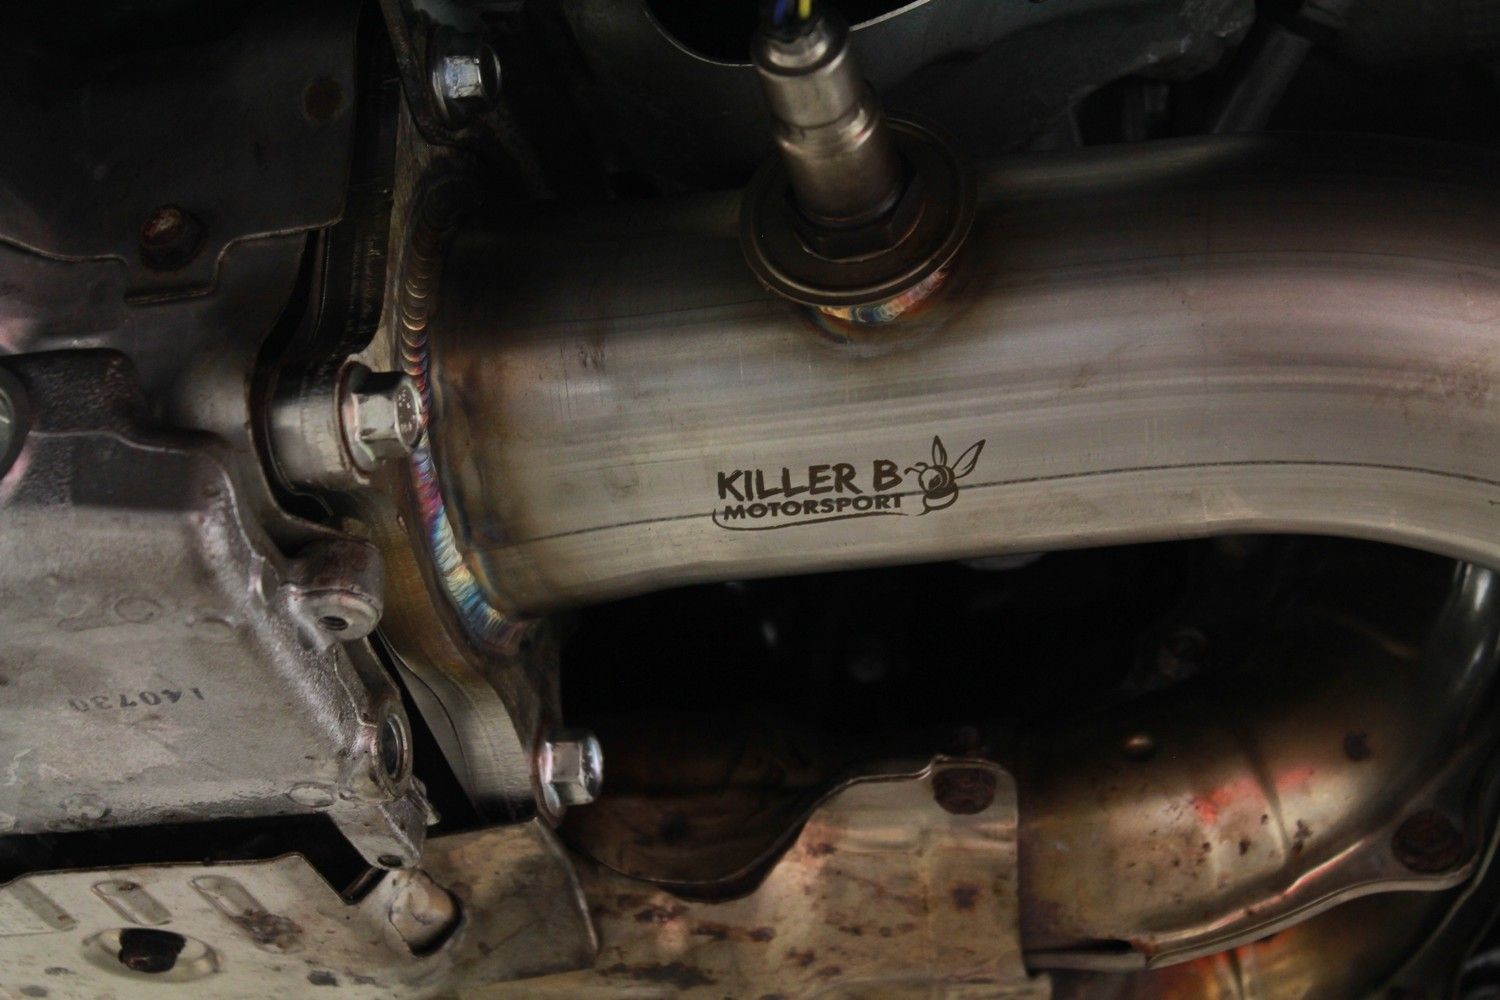
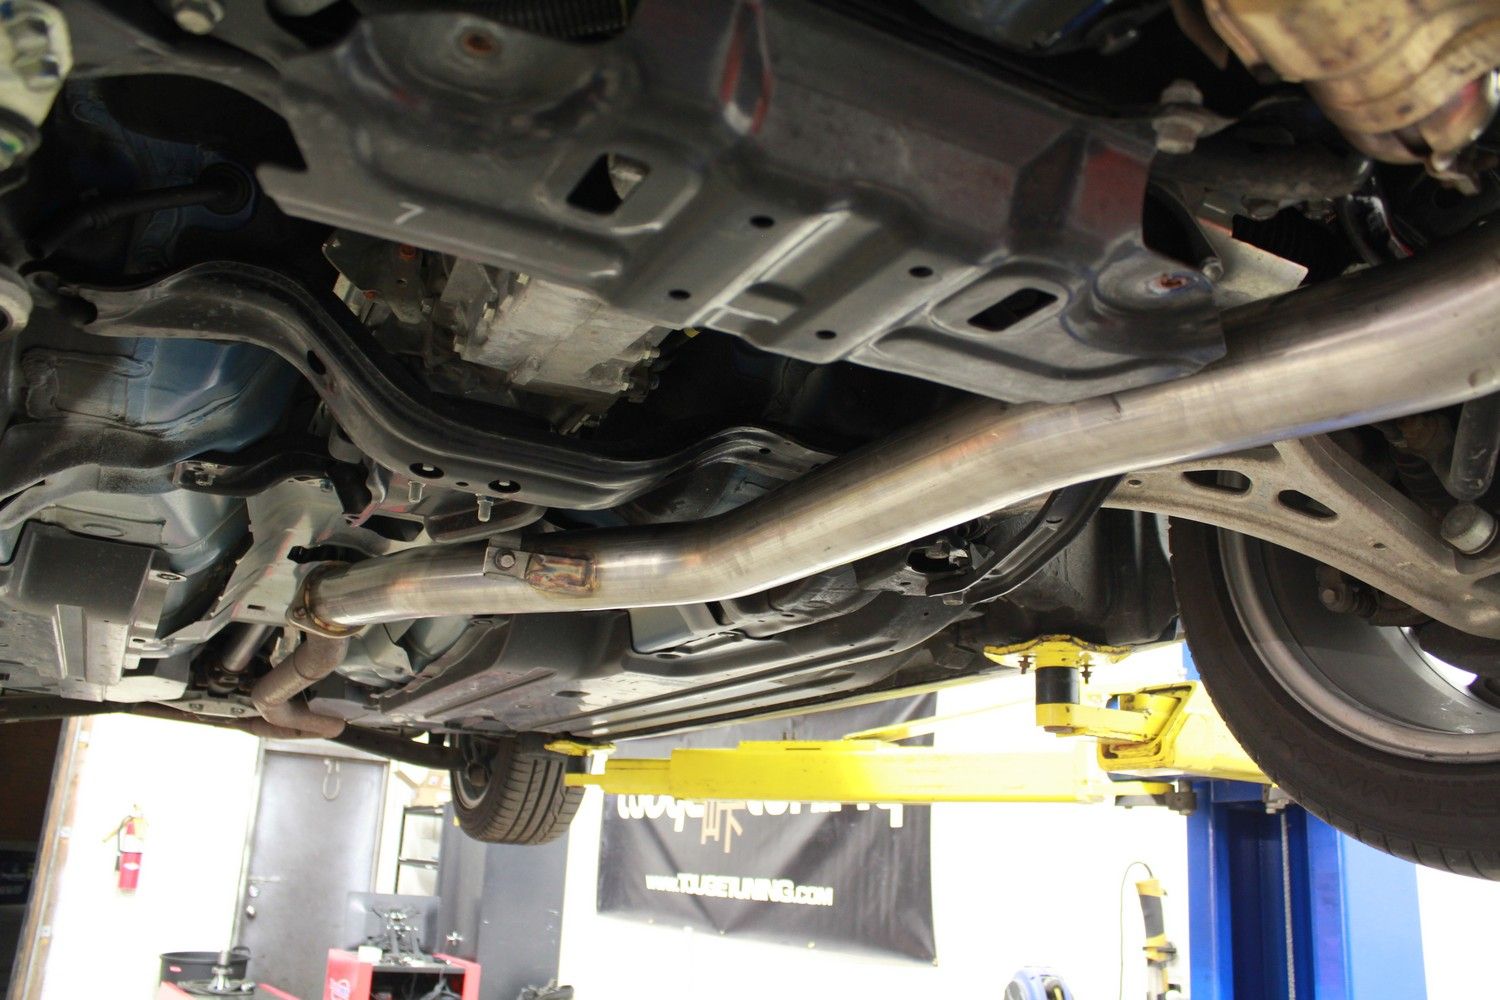
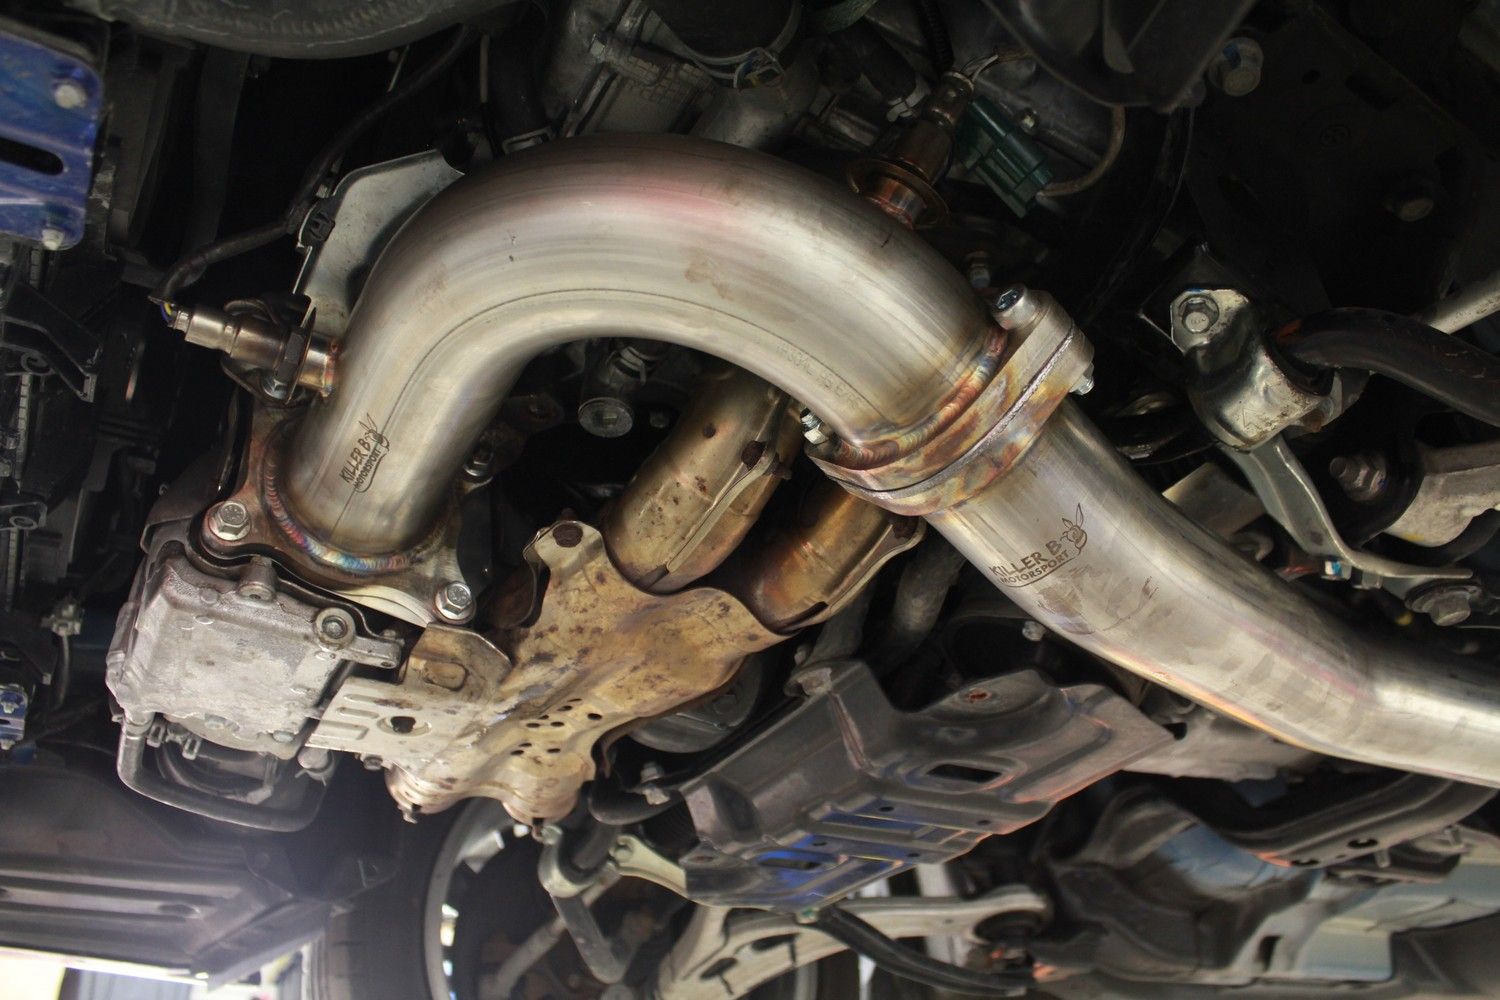
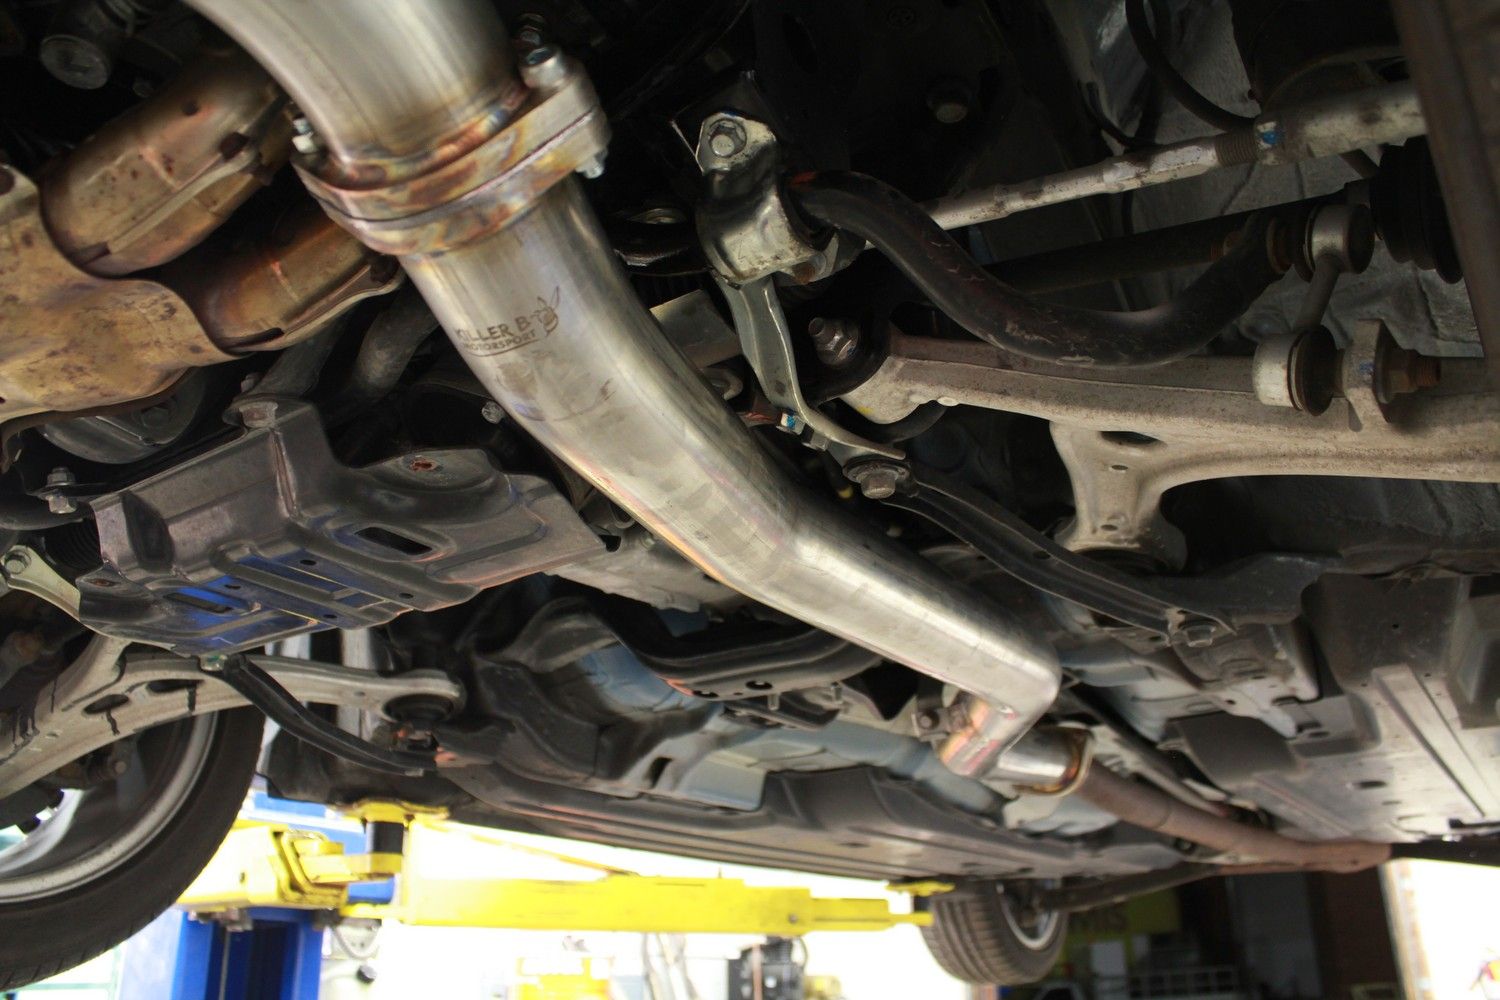
Continuing on with the power stuff we next added a catless Killer B J-Pipe and Intermediate Pipe to the car. As with most turbo cars the exhaust is usually one of the biggest restrictions to making more horespower and torque. Like most Killer B products the J-Pipe fit pretty much perfect and the quality is very good. The most difficult part was removing the factory J-Pipe to Turbo nuts/Studs which we've seen before pose big issues. We had to really heat up the studs with our torch in order to get things apart and we'd recommend either having new nuts/studs or replacing the studs with bolts when doing this job. Once that was out of the way the new pipes went on nicely and with the supplied graphite gaskets were able to seal up with the factory cat-back system. One thing I noted while doing the install is the factory cat-back does not have the typical resonator in the mid-pipe like previous generations. There's a resonator in the intermediate pipe which we replaced. Upon start-up this became very apparently as the exhaust was very raspy and hollow sounding. The turbo/induction noises were cool but ultimately it was not what I wanted and we already had a cat-back on the shelf for the car but wanted to add that after. While doing this we also removed the second restrictor pill as noted by COBB's map notes to try and help boost control. On to the important parts, we strapped the car onto the dyno and let Sasha at OnPoint dyno do his thing. As expected the car made more power, we saw an increase in torque of about 15ft/lbs and horsepower increased by around 25WHP compared to with the TGV and Intake alone. This brings our overall increase from stock up to 33% Horsepower and 26% torque.

The spikes in power you see are caused by the boost control system and rather then spending time messing around with it we had Sasha get it relatively safe since we had a Grimmspeed EBCS, different J-Pipe and Cat-Back to install before final tuning was to be done.

Event: Dyno
Location: Touge Tuning, Mississauga Ontario
Ambient Temp: 15C - May 2015
Elevation: 249 ft.
Weather: Warm
Car: 2015 Subaru WRX
Tuner: Sasha from OnPoint Dyno
Dyno Info: Dynapack
Transmission: Stock 6 speed
Gear: 4th
Stage 2 + TGV + Intake Peak HP at RPM: 280 @ 5900RPM - SAE J1349 (2004) Corrected
Stage 2 + TGV + Intake Peak Torque at RPM: 315 @ 2900RPM - SAE J1349 (2004) Corrected
Stock Peak HP at RPM: 212 @ 4900RPM - SAE J1349 (2004) Corrected
Stock Peak Torque at RPM: 250 @ 2500RPM - SAE J1349 (2004) Corrected
Baseline HP/TQ for Stock 2010 STi on same dyno: 228WHP/240WTQ
Target Boost: 20PSI Tapering
Fuel: 94 Octane Petro Canada

Mod List
-COBB AccessPORT - Custom Tune
-Turn In Concepts TGV Deletes
-AEM Intake
-Killer B Cat-Less J-Pipe and Intermediate Pipe

Image

Image

Image
Image
Image
Image
Image
Image
Image
Image
Chris - Sales@tougetuning.com - P.905.405.0682
Tues-Fri 12-8pm, Sun. 12-8pm - 996 Westport Cres Unit 2
www.TougeTuning.com - Follow us on Facebook

Cobb|DBA|Hawk|Powerslot|Ferodo|Whiteline|Grimmspeed|TiC|Kartboy|Invidia|Swift|Motul|Rally Armor|ACT|Blouch|Injector Dynamics|Deatschwerks
Avatar de l’utilisateur
Touge Tuning
Rookie
Messages : 56
Inscription : mar. janv. 30, 2007 9:56 pm
Localisation : Toronto

Re: Touge Tuning's 2015 WRB WRX - Northstar

Message par Touge Tuning »

Latest update on Project Northstar incoming!

Latest round of upgrades to my 2015 WRX went on earlier in June and should be pretty close to all I plan to do power wise to the car. As per my previous post we had installed the Killer B catless J-Pipe with the stock cat-back and it made good power but I am preferential to a catted exhaust system. With that in mind we acquired an Invidia Catted J-Pipe to mate to the COBB Cat-Back that was waiting in the wings. The reason I chose the COBB Cat-Back is that I felt it fit the bumper cut-outs the best and from past experience COBB exhaust systems fit amazingly well. We took the time to swap out the Killer B J-Pipe and Intermediate pipe for the Invidia piece and at the same time installed the COBB Cat-Back. Installation was a breeze and everything fit up nicely. At the same time since the car was going on the dyno the next day we also installed the Grimmspeed EBCS as we found the factory BCS system to be poor. The Grimmspeed EBCS went on perfectly and is an important piece for those looking to go to stage 2+ power levels just like previous generation Subarus. Dyno Sheet and more info to come later.

On June 19th I attended the Hanson Driving School again for the 3rd time with my 2015 WRX. The weather looked promising and with the the above mods I was looking forward to listening to the smooth exhaust note of the FA20DIT. For this school I was moved up to the advanced group as the school had a lot of people sign up for the beginner group so people were getting moved. My instructor again was @bdon22; who also happened to have his beast of a 2006 WRX finally back out on track. The car is still running the same stock tires/wheels, StopTech Street Performance Pads and AP Racing Brake Fluid. Brandon immediately noticed the increase in power from last time and also a huge improvement in my driving as well. After the 2nd or 3rd session Brandon mentioned he felt I should be "signed off" which basically enables you to lap at the school without an instructor in the passenger seat. After a bit of confusion we ended up going back out on track right behind Peter Hanson driving around some students. After about 5-6 laps I somehow managed to stick right behind him and after the session was over Peter came over and the first thing he said was "I was sure i'd lose you in 2-3 corners". He then started asking me about the car and when I told him it had stock calipers, stock discs, stock brake lines, stock tires, stock suspension etc etc. he seemed extremely impressed by what such a stock car was capable of.

I've been reading some discussion as of late about the StopTech Street Performance pads so I wanted to give some feedback on these. To start these are a STREET brake pad, they are not really geared towards being used on track and really are not good for competitive racing. They're a relatively inexpensive pad upgrade that will give you better performance then the stock pads without the common issues with more track oriented pads such as being noisy. They are a nice improvement over the stock 2015 WRX pads but I still experienced pad fade after about 3 laps at DDT. Not as bad as the factory pads were when they went but compared to a solid track pad they are far below that. Something to keep in mind with brakes is your experience is very much dependent upon your pace and how hard you are on the brakes. So for the casual lapper these would be fine, however they aren't a replacement for track pads.

Image
Image
Image
Image
Image
Image
Image
Image
Image
Image
Image
Image
Image
Image
Image
Image
Image
Image
Image
Chris - Sales@tougetuning.com - P.905.405.0682
Tues-Fri 12-8pm, Sun. 12-8pm - 996 Westport Cres Unit 2
www.TougeTuning.com - Follow us on Facebook

Cobb|DBA|Hawk|Powerslot|Ferodo|Whiteline|Grimmspeed|TiC|Kartboy|Invidia|Swift|Motul|Rally Armor|ACT|Blouch|Injector Dynamics|Deatschwerks
Avatar de l’utilisateur
Touge Tuning
Rookie
Messages : 56
Inscription : mar. janv. 30, 2007 9:56 pm
Localisation : Toronto

Re: Touge Tuning's 2015 WRB WRX - Northstar

Message par Touge Tuning »

Video from the last Hanson school at DDT

Chris - Sales@tougetuning.com - P.905.405.0682
Tues-Fri 12-8pm, Sun. 12-8pm - 996 Westport Cres Unit 2
www.TougeTuning.com - Follow us on Facebook

Cobb|DBA|Hawk|Powerslot|Ferodo|Whiteline|Grimmspeed|TiC|Kartboy|Invidia|Swift|Motul|Rally Armor|ACT|Blouch|Injector Dynamics|Deatschwerks
Avatar de l’utilisateur
Touge Tuning
Rookie
Messages : 56
Inscription : mar. janv. 30, 2007 9:56 pm
Localisation : Toronto

Re: Touge Tuning's 2015 WRB WRX - Northstar

Message par Touge Tuning »

Some nice shots from the second Hanson driving school.

Image
Image
Image
Image
Image
Image
Image
Image
Image
Image
Image
Image
Image
Image
Image
Image
Image
Dernière modification par Touge Tuning le jeu. juil. 23, 2015 7:22 pm, modifié 1 fois.
Chris - Sales@tougetuning.com - P.905.405.0682
Tues-Fri 12-8pm, Sun. 12-8pm - 996 Westport Cres Unit 2
www.TougeTuning.com - Follow us on Facebook

Cobb|DBA|Hawk|Powerslot|Ferodo|Whiteline|Grimmspeed|TiC|Kartboy|Invidia|Swift|Motul|Rally Armor|ACT|Blouch|Injector Dynamics|Deatschwerks
Avatar de l’utilisateur
tiaa
Scooby FREAK
Messages : 2049
Inscription : jeu. juin 25, 2009 9:01 pm
Localisation : saint-jean-sur-richelieu

Re: Touge Tuning's 2015 WRB WRX - Northstar

Message par tiaa »

The car sound great
jean-simon
Vw golf mk7 tdi 2017
FORESTER XT 2016.
WRX 2016-2015-2012-2009
Legacy 2005
Avatar de l’utilisateur
Père Foura
Scooby Specialist
Messages : 249
Inscription : ven. mai 04, 2012 6:20 pm
Localisation : Donnacona

Re: Touge Tuning's 2015 WRB WRX - Northstar

Message par Père Foura »

Quite impresive for the new series of engine!
Avatar de l’utilisateur
Touge Tuning
Rookie
Messages : 56
Inscription : mar. janv. 30, 2007 9:56 pm
Localisation : Toronto

Re: Touge Tuning's 2015 WRB WRX - Northstar

Message par Touge Tuning »

Slightly behind schedule but wanted to provide an update on the car for it's last track outing which was for Round #2 of the CSCS Time Attack series. This round was held at Toronto Motorsports Park in Cayuga, Ontario and I am very familiar with this track having turned quite a number of laps on my race bike and in different cars. Unlike DDT, which is very much a drivers track, TMP is much simpler which usually makes the competition much tighter. It also definitely helps to have decent power here as the 2 straights can be a huge difference and to put in perspective on a previous date Project Blackout was hitting 192KM/h and Northstar is only capable of 168-170KM/h. The only major change I made for this event was to put on a set of Hankook RS-3 Tires in a 245/40R17 size which are the staple for most street class competitors. These are 10mm wider then the stock tires and have a treadwear of 200, I've driven on them before and for the money they are a veyr good performer. I was running the Hawk HPS 5.0 in the front and StopTech street in the back for this round as I wasn't sure the StopTech's in the front would last the event.

The weather was HOT!!! Exterior Temp gauge in the car was showing 32C so i'd imagine closer to 40C with the humidity. This was definitely going to hurt all of the turbo cars on track with heat soak. First session out to scrub in the new tires and immediately I noticed how much more grip the new tires had right away. I was placed in intermediate for qualifying/practice which proved to make it very difficult to get a clean lap in and there was a lot of poor decisions made by other competitors which made it a little frustrating. First session cruising around just to get the tires up to temp the best lap was a 1:24.813 which was only 0.050 slower then my previous best time which isn't too bad. Came in and checked everything out, reset the pressures and let the car cool down. As i'm not too concerned with not qualifying every qualifying session I like to take friends, customers or family out to show them what it's like on track. While this will make the lap time suffer slightly due to the added weight it's not been an issue yet. Second session was the first qualifying session and there was a lot of traffic but the first clear lap I was able to get down to a 1:23.359 on my 4th lap. I was pretty floored to be able to hit this sort of time as I figured the tires would be worth about 1 second a lap at TMP but this was already 1.4 seconds down. With the new tires the car was very different, it had more grip everywhere and the way I had been driving with the stock Dunlop's was not working as well for the Hankooks as the car just hooked up so much better. 3rd session, second qualifying session, I was able to take out my young cousin out who loves cars, trucks etc. I actually was able to set my fastest qualifying time of 1:23.134 with him in the car which was awesome and he was super excited. When we came in he asked my aunt if he could go again as he loved it that much....hoping I have planted the seed for him to get into some karting!

Image


The next session I tried to focus on consistency and worked on getting a good exit out of turn 1 and 6 which are very critical to putting in a solid lap. The car ran consistent all day with no issues with oil temps, coolant temp etc. The Hawk HPS 5.0 impressed me with how much more consistent they were then the Stoptech's on track. The brakes still fade considerably and my braking markers were way too early due to the lack of good calipers. This is still probably the weakest point of the car IMO and I'm hoping to address this soon once StopTech releases their ST-40 BBK for the front. Last session was cut short due to a car spilling oil on the track and there wasn't much to talk about. As I mentioned earlier, TMP usually makes the times much closer and this was definitely the case with Street AWD seeing 2nd through to 6th place all within about 1.5 seconds of each other. Friend and Team mate Project Blackout was about 2 seconds ahead of the 2nd place qualifier. I ended up qualifying in 5th with my time so I was the second last car on track.

On track I warmed up the tires, made sure traction control was off and reminded myself of the areas to focus on. The first hot lap ended up being my fastest at a 1:23.058 followed by a 1:23.187 and a 1:23.517. I am very happy with how close the laps were together but slightly disappointed I wasn't able to drop time each consecutive lap. On the second hot lap I ran a few feet too deep past the kink and ended up going two wheels off in the left hand turn which ruined the last sector and threw me off for the start of my last hot lap. That's part of racing though and is a lesson learned. Even with all my effort I unfortunately finished in 6th place, yes that's last placed for the time attack session. I believe there was 8 or 9 entries for Street AWD which is awesome to see. The positive side of things is that between 2nd place and me in 6th there was only 0.6 seconds separating us. This is awesome competition and is great to have things be so close! It also doesn't make me feel so bad as the WRX is pretty out-gunned in the class right now. With some good calipers (Brembo, StopTech, AP Racing) and actual track/race pads I think the car could go quite a bit faster but I won't get into any keyboard racing. Once again congrats all of the competitors and winners, it's been awesome this year with a lot of friendly competition and no drama.

Image


All day I used an AIM Solo, which is a very accurate GPS lap timer, to record lap times and data to look over afterwards. After taking the time to clean up the data for consistency and only looking at the clean laps there is definitely some improvement to be made as the car sits now even without any upgrades. A good GPS lap timer, like the AIM Solo, is a great tool to help you become a better driver and figure out where the strong/weak areas are. Some of the most revealing information was that if I strung the last sector of the first hot lap with the next 3 sectors of the second hot lap I would have achieve a 1:22.837. This just proves to me that I need to continue to focus on consistency and accuracy in all areas. It also shows me my theoretical best lap based on the best section times recorded. This is a 1:22.576, something to aim for in the future for sure! I won't bore you with too many more details but if you want more information check out http://www.jamescolborn.com/aim-data-analysis/ for some great tips on how to use a lap timer to improve your driving.


Round 3 is coming up this weekend in Quebec and we're hoping for a good result with no changes made to the car.

Image
Image
Image
Image
Image
Image
Image
Chris - Sales@tougetuning.com - P.905.405.0682
Tues-Fri 12-8pm, Sun. 12-8pm - 996 Westport Cres Unit 2
www.TougeTuning.com - Follow us on Facebook

Cobb|DBA|Hawk|Powerslot|Ferodo|Whiteline|Grimmspeed|TiC|Kartboy|Invidia|Swift|Motul|Rally Armor|ACT|Blouch|Injector Dynamics|Deatschwerks
Avatar de l’utilisateur
Touge Tuning
Rookie
Messages : 56
Inscription : mar. janv. 30, 2007 9:56 pm
Localisation : Toronto

Re: Touge Tuning's 2015 WRB WRX - Northstar

Message par Touge Tuning »

Just back from my journey out to Quebec for the third round of CSCS hosted at iCar in Mirabel Quebec. This is the first time attack event CSCS has done outside of Ontario and we hope this will continue in the future. It was exciting but also intimidating going to compete at a track I had never been to, for that matter none of the competitors in Street AWD had either. But then again that's what makes racing such a fun sport to compete in, the unknown and challenge. @NBK; and I cruised down from the shop to Montreal (Laval area) Saturday so we could be well rested. Northstar ended up getting around 8.74 calculated fuel economy cruising at 120KM/h, that's loaded up with helmets, full set of wheels/tires and some other miscellaneous things. Pretty damn good and I'll likely be trying to improve upon this with some dedicated cruise fine tuning with OnPoint Dyno. Mark the owner of Mooresport invited us for a private tour of their facility which was awesome, we'll be doing a write up on this separately.

Sunday morning we cruised over to the track and we set-up the pit area with Mooresport who is a sponsor of CSCS. The pit area at iCar is actually in the middle of the track which is pretty cool as it makes it easier to watch and see more of the action on track. With the simplicity of Northstar all I had to do was remove the front plate, install the tow hook and swap on the Team Dynamics wheels and Hankook RS-3 Tires. Due to the smaller expected turn out CSCS ran 2 groups with 20 minute sessions which was pretty good as you could go out halfway through and still get a good amount of time on track. First session out on track was pretty nerve racking, I definitely had no idea what the next corner was and spent this time just getting a feel for the track. My first thought was that the track had low grip levels (it had rained up until the early morning) and that if you lost it in some of these corners you would be into the steel barriers pretty quickly. Unfortunately someone in the group lost control and ended up nose first into a barrier after about 3 laps. Luckily no one was hurt and the clean up was relatively minimal.

Image


Second session was better and I was starting to learn the course and make some strides towards actually putting in some times. One thing that took some getting used to is that the curbing is not really meant to be hit in some places and is designed very bumpy to keep you off of them. Also the track is really varied with really no 2 turns being overly similar and I kept finding myself waiting to get on the gas only to realize that I could have gotten on the gas earlier. I also reverted back to bad habits such as not looking far through the corner. I believe this was likely due to not knowing the track and not totally trusting the grip levels. The second session most of the dampness was gone and I was able to put in a lap of 1:54.324 which I wasn't sure at the time if it was good or bad since this was the first timed session. Third session I got more comfortable and was able to begin analysing the corners and trying different paths through the corners to find what felt the best and what I could achieve consistently. This session saw me do a 1:54.208 which put me in 3rd out of 5 at the time for qualifying. In this session I started to find the brakes fading after 2-3 laps, mainly due to the few hard braking zones which are spaced out but with the stock calipers there's not enough time in between for the set-up to cool down. RooDucts has provided us a set of their ducts to test fit and we will try these out and see if it helps at all.

Image


Session four is when I really started to get comfortable and was able to put in 3 laps in the 1:53's with the best being a 1:53.002. A lot of the time made up came from finding references that I could use for getting on the gas and braking consistently. Last sessions didn't end up doing much for overall time as every fast lap I came upon a slower vehicle in a non-passing area. Instead of trying to force the issue I spent the laps focusing on the weak corners to try and gain some more time back. I managed to stay in 3rd place for qualifying so I was going out 3rd on track behind team mate and friend @NBK. Luckily the competitors in our class all know each other and we all agreed to give each other as much space as possible so that no one got held up on track. It's great to be involved in a sport where all the competitors are looking out for each other. On track my first lap was decent but I made a few mistakes cheating (turning early) into corners which cost me some time. I put down a 1:53.018 on the first lap but I felt the car had a little more left in it. I made sure to be patient and not rush any of the corners and be smooth with my steering and throttle. Second lap was a 1:52.635 which ended up being my best lap for the day, third lap was very close at 1:52.687. I always like to see consistent laps back to back, if I can't be consistent then it's very hard to improve the car and my driving. CSCS's lap timing system put me down at 1:52.445 which is mainly due to the slightly different start/finish position where I set it up on the AIM SoloDL. I felt good about my times and luckily this was good enough to put me into 3rd place again for the second time this season. I'm really excited by the result and am still hoping to get some good brakes on there soon (COME ON STOPTECH!!!).

Congrats to @NBK for his third 1st place finish in a row, he's really been dominant this year and I'm hoping we can help him continue the streak! Another congrats to Ryan (RHD GC) who finished second with an awesome drive, really great to see new and old faces pushing their cars at the track and having fun! Presently I'm sitting in 4th position with 50 points between me and the third place in the championship.

All photos are from http://QNR.ca which is an awesome Quebec based website, thanks for the amazing coverage and photos of my car and Project Blackout.


Image

Image

Image

Image

Image

Image

Image
Chris - Sales@tougetuning.com - P.905.405.0682
Tues-Fri 12-8pm, Sun. 12-8pm - 996 Westport Cres Unit 2
www.TougeTuning.com - Follow us on Facebook

Cobb|DBA|Hawk|Powerslot|Ferodo|Whiteline|Grimmspeed|TiC|Kartboy|Invidia|Swift|Motul|Rally Armor|ACT|Blouch|Injector Dynamics|Deatschwerks
Avatar de l’utilisateur
Touge Tuning
Rookie
Messages : 56
Inscription : mar. janv. 30, 2007 9:56 pm
Localisation : Toronto

Re: Touge Tuning's 2015 WRB WRX - Northstar

Message par Touge Tuning »

It's been awhile since I was able to update the journal, sorry as always! The weekend after iCar was the Toronto Subaru Club 1st Annual Charity Track day hosted in conjunction with Davenport Subaru and Subaru Canada. The track portion was run by SPDA who operate schools at DDT throughout the year. Having been to an SPDA event before I knew that this would be a well organized event with safety as the number one priority. This is a really important aspect that many overlook when deciding to go to the track. While the appeal of a $60-100 lapping day is nice, these events almost never have any drivers meetings, group structure, minimal marshalling and most important an ambulance. Like myself, most of those attending the track are doing so in their daily driver that they need to get to work the next day. So being on track where you aren't worried about getting t-boned by someone reckless is important to myself.

I am excited to see TSC finally having an event at the track where TSC members can push their cars in a safe environment together. The event was well organized as expected and other then 2 non-subaru attendees there was no hooliganism or stupidity. Everyone was very respectful and I think people learned a lot about themselves and their cars. I know a few members who had some questions for me at the track really were able to improve their driving with a few little tips I was able to provide them. I really hope there is another event in 2016 and maybe even more then 1 a year would be amazing! As is pretty evident I am a big proponent for taking cars to the track and enjoying them so this is just another way that Subaru owners specifically can do so with their fellow owners. The weather was pretty much perfect all day with only a light shower nearer to the end of the day. Northstar ran flawlessly all day and it attracted attention all day for being able to consistently run fast laps all day. I was able to take a few people out on track and maybe if they see this they can comment on what they thought. Hats off to Davenport Subaru for making this event reality and to SPDA for keeping everyone safe and organized all day!

I have some videos courtesy of WASPcam that I am having edited into a short video, I will post that up when it's ready.

Next I was able to do some new "mods" to the car, unfortunately these aren't really designed to make the car go faster but just make it look a little less "corolla" like. After looking at the options available for front lips and rear spoilers I decided that Stillen had the best looking options and knowing they are made in the USA by Stillen is a huge plus as the cheaper stuff from eBay etc never fits right. We ran a group buy and 3 others have the beautiful from lip on their 2015's. Installation is a breeze as it comes with pre-installed genuine 3M double sided tap and nice self tapping screws for mounting. It also includes the 3M adhesion promoter to help with the double sided tape sticking to the bumper. The lip comes pre-painted in a low gloss black that pretty much suits every car unless you want to colour match which is always an option. Fit on the lip is spot on, no twisting, cutting, pulling or anything needed....it even has 2 holes that line up perfectly with bumper clip holes in the bumper. For the trunk spoiler the Stillen offering is a small lip spoiler that is similar to the OEM one but a little more aggressive looking. Again the lip comes with pre-installed double sided tape, 3M adhesion promoter and fits absolutely perfect. With curved trunk spoilers a lot of times the ends will not line up or the edges will be raised. The Stillen piece fits perfect right up to each edge of the trunk and IMO really makes the back of the car look so much better now. For anyone interested we do have 2 of the Stillen trunk spoilers available on hand.

Image
Image
Image
Image
Image
Image
Image
Image
Image
Chris - Sales@tougetuning.com - P.905.405.0682
Tues-Fri 12-8pm, Sun. 12-8pm - 996 Westport Cres Unit 2
www.TougeTuning.com - Follow us on Facebook

Cobb|DBA|Hawk|Powerslot|Ferodo|Whiteline|Grimmspeed|TiC|Kartboy|Invidia|Swift|Motul|Rally Armor|ACT|Blouch|Injector Dynamics|Deatschwerks
Avatar de l’utilisateur
Touge Tuning
Rookie
Messages : 56
Inscription : mar. janv. 30, 2007 9:56 pm
Localisation : Toronto

2015 WRX Project Northstar - CSCS Round #4 at SMP

Message par Touge Tuning »

After the TSC Charity track day there was a bit of a gap between the next track event as CSCS was forced to re-schedule one of their events. Unfortunately the event at Grand Bend on August 16th was bumped by an NHRA event that was rained out earlier in the year. With limited time CSCS was able to secure the track on the 30th at Shannonville Motorsports Park in Shannonville, Ontario. I'm admitedly not a fan of SMP as I have been there many times years ago on my motorcycle and did not enjoy it. The track is VERY abbrasive, the in-field and run-off areas all are very bumpy and I have seen many bikes and cars destroy suspension and wheels after a small off track excursion. But this was where we had to compete for Round 4 so there's not really much that can be done so no point in worrying about it. Since the last event the only major update to the car was finally getting a set of StopTech ST-40 Big Brakes for the front. I don't want to give too much information as I'll be doing a full write-up on these but they are a huge improvement over what I had, Factory Slider Calipers with Hawk HPS 5.0, even with the standard StopTech Street pads. Other then that I changed the rear diff fluid and engine oil/filter the day before the event. I had planned to do the transmission but ran out of time...more on this later..

ImageImage


We arrived to SMP around 830am and swapped over from the stock WRX wheels to the Team Dynamics/Hankook RS-3 that we've run for the past 2 race events and a few lapping days. They were wearing quite nicely and they definitely had more then enough life for the rest of the last event on September 20th. Our friend Charles, one of the CNC & Fabricators at MSI, was on hand with the Mooresport Support Trailer at the event so we set-up with him. There were only 2 groups being run and the time attack was being run on the very short Nelson circuit which i've never run before although I had been on about 3/4 of that layout running long track configuration. The Nelson layout is veyr short with only 2 major braking zones, a section of 3 consecutive hairpin turns and a fast entry turn 1. Because of the short nature of the track it was very difficult to get a clean lap in with all the traffic on track and minimal passing zones. Initially the car felt poor as I hadn't checked the pressures to go out and the track temp was still relatively low. After raising the pressures up the car felt much better although the last part of the track really is not much fun in an AWD car unless you have it set-up well to rotate. Turn 1 is a pretty fast entry corner where confidence and feeling is very important. Looking at the data from the day I was entering the corner around 140KM/H and seeing a minimum speed in the corner of about 127KM/h. Being confident on entry and not using the brakes was important and then getting on the gas as soon as possible. Turn 2 is the first heavy braking zone and the StopTech BBK performed flawlessly here. This leads into another right turn and then a slight kink. What I believe is turn 4 is very tricky as the turn visually looks like it is much earlier then it is and it is a decreasing radius. Throughout the day as I got more comfortable I found that you could somewhat square off turn 4 and get a very good drive out of it rather then driving it in an arc. This leads into a very narrow "straight" section that lead to some very sketchy passing as the track is barely wide enough for 2 cars. This narrow section saw peak speeds of 140+ KM/H into the second heavy braking zone which then had 3 hairpins going right, left and right leading back onto the start/finish straight. The WRX is still running all factory suspension and I've only adjust the front camber bolts for max negative camber so it does not have a proper alignment. The hairpin section required a lot of patience on the throttle as it was easy to induce understeer.

Image


Lap times were in the 1:02-1:04 range for most clean laps and it was difficult to really find places to make up large amounts of time. I ended up qualifying 4 of 4 with a 1:02 flat which I was happy with. I wasn't able to really get many good laps in as I experienced fuel starvation on the WRX for the second time as the fuel level ran below 1/2 tank. The first time this happened was at iCar in the final time attack session through a high speed kink with a depression at exit. The engine would slowly lose power and then slowly come back to life. At iCar I had just over 1/4 tank but at SMP I started to experience fuel starvation at just under 1/2 a tank. The issue was occuring initially at the exit of turn 1 as I was shifting from 3rd to 4th gear the car. This was definitely a cause for concern as SMP was also the hardest track on fuel where I was using about 1/4 tank of fuel on a full session on track. I ended up driving to the closest Petro station about 25 minutes each way to fill the car back up to full. Better to have added weight then starve the car of fuel, right? I will be looking into whether this is a sloshing issue or something with the DI system that is going to continue. I believe it is an issue with the in-tank/lift pump and fuel sloshing as I never once had fuel starvation at DDT or TMP. Radium Engineering offers a pretty sweet new in tank set-up with a nice baffled "sump" which may be an option to solve this.

Image


Going out last on track for the time attack session definitely allowed me to set a large gap with the car in front of me and just run my own laps without any pressure. First flying lap would be my fastest of the 3 with a 1:02.235, laps 2 and 3 were 1:02.596 and 1:02.797 respectively via the AIM SoloDL that I use for all on track timing. This ended up putting me in 2nd place for the day which was a huge surprise and I am pumped to move up a step from the 2 thirds that i've had this year. This result bumped me into 3rd spot for the season championship with a very very long shot at moving to first depending on the results of the last event. However there is a bad side to this which is that I have hurt a bearing inside the transmission which now whines on decel all the time. We haven't found the source of the noise yet but we did replace 2 of the 4 bearings in the center diff area with no change. We're waiting on the other 2 bearings to come off back-order as one of the 2 we didn't do did not feel smooth. I believe this could have been avoided if I had taken the time to change the transmission fluid the night before. I believe the root cause is the tight slow turns and abrasive surface which caused the fluid to overheat and ultimately lead to bearing wear/failure. Hopefully we can get this fixed before the 20th but if not we'll just have to run it as is and deal with it later. The lesson here is that it is important to replace the OEM fluids as they are just not up to the task of extended track use.

Image

Image
Image
Image
Image
Image
Image
Image
Chris - Sales@tougetuning.com - P.905.405.0682
Tues-Fri 12-8pm, Sun. 12-8pm - 996 Westport Cres Unit 2
www.TougeTuning.com - Follow us on Facebook

Cobb|DBA|Hawk|Powerslot|Ferodo|Whiteline|Grimmspeed|TiC|Kartboy|Invidia|Swift|Motul|Rally Armor|ACT|Blouch|Injector Dynamics|Deatschwerks
Avatar de l’utilisateur
Touge Tuning
Rookie
Messages : 56
Inscription : mar. janv. 30, 2007 9:56 pm
Localisation : Toronto

Re: Touge Tuning's 2015 WRB WRX - Northstar

Message par Touge Tuning »

Throughout the upgrade process of the 2015 WRX I have repeatedly said that the brakes are one of the weakest points of the whole car and are holding back lap times. The goal has always been to install a set of big brakes, whether it be an OEM swap from an STi or aftermarket. While putting on STi calipers and rotors would work well, they also can be very restrictive when it comes to wheel fitment options. I also wanted to take advantage of the weight savings offered by an aftermarket Big Brake Kit such as the ones offered by StopTech. After waiting for a release by StopTech for their 2015 WRX kits I ended up deciding that the front kit was not what I wanted. Already having 3 sets of 17" wheels that will see time on the car I was not prepared to upgrade all of the wheels to 18" to fit the 355x32mm kit they released. After some talking with StopTech and using their awesome templates I was able to determine that one of the 332x32mm kits for the GD STi would work well for my needs. The only extra piece needed was the braided brake line kit for the 2015+ WRX since the ones included would not work perfectly.

The biggest issues surrounding the stock 2015+ WRX brakes for me were the inconsistency in pedal feel, the squishy feeling that sliding calipers have and the inability to do more then a lap and a half before the braking performance significantly would drop off at the pace I was running at. For those who are doing casual lapping the stock brakes are actually pretty decent in size and function. As with the premise of this project I have taken a calculated process of upgrading the car only after getting myself close to using the full potential that the car had in it's current state. While i'm sure there's a few tenths left in the car I have had many good drivers ride shotgun and drive the car and all have stated they felt I was extracting almost the full potential of the car as it sat. This isn't me trying to wave my own flag but wanting to make it clear that I am trying to make changes that can be substantiated by hard evidence and aren't skewed based on just having more seat time in the car that coincides with the installation of new parts.

We ordered the brakes and in just over 2 weeks had them in hand and ready to install. This luckily gave us time to install these before the Fourth Round of CSCS at Shannonville Motorsports Park on August 30th. Everything you need comes in 2 boxes and is all nicely packaged and sealed so there's no guesswork of where things go. The included instructions were for the GD STi but all we really needed was the torque specs for the hardware as the rest of the process was something we had been through many times before. Here you see the rotors are individually packed and sealed, each caliper comes in it's own smaller box packed securely in foam.

ImageImageImage


So I'll start first by outlining the disassembly process of the stock brakes and then we'll move on to the components and installation. Starting off we have the factory wheels still mounted up on the car showing how it looks and fits together. It leaves a little to be desired in the looks factory but the size is at least decent.

Image


Start by loosening and removing the 5 lugs/locks and remove the wheel from the hub. With the wheel removed you can see the very worn and grooved factory rotors which have seen better days and at this point would need to be turned on a brake lathe to be re-installed on the car. We also have the factory caliper in place which will be the first to be removed. You can do this in 2 stages by removing the actual caliper from the bracket or you can just undo the 2 bolts holding the bracket to the knuckle and remove the whole assembly in one shot. Make sure to hang the caliper off of the springs so as not to put any stress on the brake line. A bungy cord works well for this looped around the upper part of the springs. It also is useful to install a single lug nut to hold the rotor in place while removing the caliper from the rotor.

ImageImage


With the caliper removed you can now remove the rotor from the hub. In our case this was simple but on older cars you may have to hit the rotor with a mallet to loosen it up or use 2 bolts in the holes on the rotor face to walk it off if it's really stuck. With the rotor removed you can see the factory brake disc shield which is used to keep debris from getting lodged between the rotor and caliper/pad. In my case I wanted to remove these as they also have a tendency to trap heat inside the rotor and not allow it to cool it's best. This is a simple process by removing 3 bolts and the cover comes off. Depending on the kit being installed you may have to trim the cover if you want to leave it in place but removal was the choice for us.

ImageImage


The last step in the removal process is undoing the factory rubber brake line. Before doing this I would recommend spraying the flare nut with penetrating fluid when you first remove the wheels and letting it sit. A flare nut wrench is strongly recommended for removal and if the nut doesn't come loose at first use a little heat to help. Another little trick you can use is to take something like an extendable pole and use it to depress the brake pedal just slightly. By doing this you will close off the master cylinder from the reservoir and when you remove the brake line you will only lose the fluid that is in the lines and it won't drain out the whole master cylinder reservoir.

In the next post we'll go over all the parts that come with the kit, the differences in weight/size and other pertinent details. Stay tuned!
Chris - Sales@tougetuning.com - P.905.405.0682
Tues-Fri 12-8pm, Sun. 12-8pm - 996 Westport Cres Unit 2
www.TougeTuning.com - Follow us on Facebook

Cobb|DBA|Hawk|Powerslot|Ferodo|Whiteline|Grimmspeed|TiC|Kartboy|Invidia|Swift|Motul|Rally Armor|ACT|Blouch|Injector Dynamics|Deatschwerks
Avatar de l’utilisateur
Touge Tuning
Rookie
Messages : 56
Inscription : mar. janv. 30, 2007 9:56 pm
Localisation : Toronto

2015 WRX - StopTech Front Big Brake Kit Upgrade Part 2

Message par Touge Tuning »

Continuing from part one where I discussed the reasons for wanting to upgrade the brakes and the disassembly process we'll now go over the parts of the kit and the installation of it.

First we'll start off with the 2-piece front Aero Rotors which measure in at 332mm wide and 32mm thick. For those unfamiliar with 2-piece rotors the advantage of these is being able to remove weight and better heat shedding. The outer disc is made of Steel like a normal brake rotor would be but the hat section is CNC machined out of aluminum. This might not sound like a big deal but in this instance you will see that we not only have bigger rotors but they are also 4lbs lighter per corner. The WRX rotor weighs in at 21lbs 5.6oz while the StopTech 2-Piece rotor weighs only 17lbs 4.4oz .The factory WRX rotors are 316mm x 30mm which is not bad for a stock size rotor but they are quite a bit heavier. You can also see that the casting for the StopTech rotor is much nicer with better cooling vane design.

Image
Image
Image
Image
Image


Next up we have the beautiful forged StopTech caliper which I decided to get in Yellow to add a splash of colour to the car. These are just a work of art and the details on them are amazing. One of the biggest differences between doing an STi brake swap and going with an aftermarket big brake kit is that most big brake kits are radial mounted which improves rigidity of the caliper when braking. You can see the mounting bracket and the radially mounted studs on it. You will also see the StopTech street performance pads which we're using for the time being to test the improvement out of the box of these kits. We will get dedicated track pads in the future. The ST-40 caliper in this kit features 4 pistons, 2 on either side of the caliper providing a much more uniform braking force on the rotor. In contrast, the factory WRX caliper is a 2-piston sliding caliper which has a lot of flex in the design and does not provide a firm pedal feel. Even though the StopTech caliper is much larger in size it still manages to be significantly lighter in weight. We weighed the pieces individually and the StopTech Caliper, Bracket, Pads and Braided Brake Line come up to a total of 11lbs 2.9oz per side. The factory caliper, bracket, pads and brake line weighs in at a hefty 15lbs 11.2oz which means you're saving another 4.5lbs per corner while getting a significantly better caliper. As mentioned the kit includes stainless braided brake lines which have a few advantages. One of the biggest being that the stainless braided lines will have less expansion or swelling when you depress the brake pedal. This in turn translates to a firmer and more consistent brake pedal. SS Braided lines are also more resistant to tearing due to debris which can be a common issue on track.

Image
Image
Image
Image
Image
Image
Image
Image
Image
Image
Image
Image
Image
Image


Now that we've looked at the components included in the kit we can get to the installation of them. The first step is going to be bolting the caliper bracket to the knuckle using the supplied hardware and torquing to spec. Then you can clean up the hub face and apply a little anti-seize to the hub center and fit the new 2-piece rotor assembly. Again you can use a lug nut to hold the rotor against the hub surface which will make installing the caliper easier. All of the components are marked for left or right so there's no guess work when fitting things up to the right side. Before fitting the caliper it's a good idea to take a shop rag and spray it with brake cleaner and wipe down both faces of the rotor surface to remove any oil and contaminants which are put on the surface to fight corrosion.

Image
Image
Image


Next step is to put the caliper in place onto the mounting bracket. The caliper easily slides into place and you can snug up the nuts for the caliper. I would recommend installing the new pads before doing the final torquing of the nuts so the caliper is perfectly centered on the rotor. The pads go in easily by removing to bolts holding the caliper bridge to the caliper and sliding them in place. Replace the bridge and tighten up the bolts and you're set. You will have to get one bolt in first and then press the opposite end of the bridge down while installing the second bolt into the bridge as the fit is very tight since the bridge is actually there to stiffen the caliper itself. Next you'll want to install the new stainless braided brake lines. It's usually easiest to install the line to the factory hard line on the fender and then install it to the caliper side with the supplied banjo bolt and copper washers. Try to make sure the line is not twisted and then you can install the mid-point connection to the strut bracket. With this done you're ready to fill the reservoir with your favuorite brake fluid and bleed the system. Always start from the inside bleeder and then move to the outer last. I like to bleed each bleeder twice to ensure all the bubbles are out of the system.

Image
Image
Image


So what I'm sure my fellow 2015+ WRX owners are wondering is how do the brakes fit. My testing with the templates told me the brakes should easily clear the track wheels I use which are 17x9 +40 Team Dynamics Pro Race 1.2. The stock WRX wheels were very close so we weren't 100% sure if it would work. What we found was 2 very minor things which would allow the stock wheels to clear. The first was a 3mm spacer was needed to give adequate clearance from the spokes to the caliper face. This is very minor and does not require longer studs or anything like that. The second snag is that the stock wheels have a very small inner barrel of the rim which puts wheel weights very close to the calipers. In my case the weights were installed right in-line with the caliper and would make contact with the top of the caliper. We removed the weights and moved them in-board a few inches to clear the calipers and all is good. I think they look great and the tight clearance helps with that. So if you want to fit a set of big brakes like these to your 2015+ WRX we know exactly what's needed to make it work now!

Image
Image


With the wheel fitment sorted out I could take the car out and bed the pads in a little and get a feel for the new brakes. This concludes the second part and I will be writing the third and final part shortly with driving impressions.
Chris - Sales@tougetuning.com - P.905.405.0682
Tues-Fri 12-8pm, Sun. 12-8pm - 996 Westport Cres Unit 2
www.TougeTuning.com - Follow us on Facebook

Cobb|DBA|Hawk|Powerslot|Ferodo|Whiteline|Grimmspeed|TiC|Kartboy|Invidia|Swift|Motul|Rally Armor|ACT|Blouch|Injector Dynamics|Deatschwerks
Avatar de l’utilisateur
Touge Tuning
Rookie
Messages : 56
Inscription : mar. janv. 30, 2007 9:56 pm
Localisation : Toronto

Re: Touge Tuning's 2015 WRB WRX - Northstar

Message par Touge Tuning »

The racing season is over now and I wanted to combine the season wrap up and StopTech Big Brake Kit impressions into one. For those who have been attending or following the CSCS Time Attack season you’ll know that the consistent finishes with Project Northstar have kept me in the top 4 for the season. While this is a huge bonus the goal of using the 2015 WRX was never really to win but just to test out the new platform, find it’s weaknesses and improve upon the car methodically. It was a pretty big surprise to everyone at how well the car has performed all season with the only issue being a trans bearing going but since 2 other Subarus had similar issues I can’t really blame the car. I cannot get over how good the 2015+ WRX is at the track with minimal modifications, something that anyone could do as we’re not using ultra exotic race components.

Image
Image
Image

I’m not sure really where to start but I guess I’ll get into the details that most people want which is the brakes! The first opportunity to use the new StopTech Front Big Brake kit was at Shannonville for Round 4. While I did notice an improvement in braking I had no references for this track and the layout we used only had 2 braking zones so the brakes never really got worked hard in my opinion. The season finale was at Toronto Motorsports Park which i’m very familiar with and as many others do this is somewhat of the bench mark for local track cars. TMP also has a bunch of heavy braking zones so it would put the brakes through their paces much better. The first session out it was very apparent that the new brakes were a huge step forward from the factory front calipers/rotors with Hawk HPS 5.0 pads. Even with the StopTech Street pads which from my experience are not as good as the HPS 5.0 my braking points were all over the place. Pretty much every braking marker that I had been using was now irrelevant. I also struggled at first to get used to the consistency and performance as with the stock brakes I felt like I was at the limit every time I was braking and had to stay on the pedal. With the new bigger front brakes I could now brake hard and then begin to reduce pressure as I got closer to the turn in point and trail brake a little into the corners. So the first session was an eye opener big time!

Image
Image
Image

The next two sessions I was able to start to adjust to the new brakes and work my way to later braking markers. For those familiar with TMP they will know that on the start/finish straight going into turn 1 there are white marks on the left side of the track (turn 1 is a right hander). I don’t know exactly how far they are set apart but I was able to move my braking marker 1 full white mark further and then even a little more. I believe these are likely 25 feet apart but I can’t say for certain. I could consistently lap after lap use this further marker without any brake fade or “pucker” moments. This in turn allowed me to stay on the gas longer picking up a few KM/H speed as well. All positives up to this point but unfortunately I was unable to go any faster in these first 3 sessions as I was only getting about 3/4 of a lap before hitting slower traffic. I was able to get myself moved into the fastest group which was when I finally was able to do some good laps without traffic while trying to get out of the way of some of the really fast cars going 7-8 seconds a lap faster in super street and unlimited classes. With the new brakes I was able to qualify for the final session in 5th place with a 1:22.7 which was .2 seconds faster then my previous best time. This is a lot less then I expected but I knew with more seat time there was more time to be made up and all of my qualifying sessions were with a passenger.

Image

The only downside that I found with the bigger brakes was that the brake balance was changed a lot. This is only really noticeable on track and when really pushing hard. The front bias was causing the rear to become very light and it would begin to rotate while on the brakes. It wasn’t out of control or anything but moving forward I would like to get the bias better balanced. The simple method for this would be to swap in a set of more aggressive rear pads but the plan is to get the ST-20 rear kit on the car and that should help reduce the front bias. Other then that the brakes were awesome and never let me down. There’s something to be said for having extreme confidence in your brakes while on track.

Image

Back to the time attack, I was to head out 5th and wanted to just drive smooth and focus on getting on the power earlier. I set a large gap with the guy in front and did my warm up lap. First lap felt good but I knew there was more in it so I pushed harder into every braking zone and getting on the power harder and faster. The tires were also just starting to warm up at this point. At the start of the second lap I noticed that the R33 GT-R in front of me was nowhere to be seen. I believe he ended up having a boost tube pop off and was unable to finish. Coming into turn 6 I could see the 2nd place qualifier driving very slowly along the track. I came upon him pretty close to the final section of the track and unfortunately was held up which ended up hurting the final part of my second lap and the beginning of my third hot lap. It was definitely disappointing but that’s just part of racing. I luckily ended up putting in a solid first lap and came away in 3rd place for the 3rd time this season. I’m definitely pleased to have been this consistent over the season with this car and it was a pleasure to race with everyone who came out. In the time attack session my third place time was a 1:22.44 which means I dropped half a second off my personal best with tires that had seen 4+ track events. On the second lap that got held up I was down another .4 seconds so I’m curious to get back out and see what we can do with no hold ups. I’m pleased to see that all 3 flying lap times were within less then 1% of each other I just need to string together those perfect laps. I’m confident even with the StopTech Street pads I should be able to get down into the 1:21’s and maybe even further with new tires and track pads.

Image

With all that said and done I was able to finish the season tied for 2nd place in the championship which is pretty good for a full weight & fairly stock 2015 WRX. I’m going to set a goal for the car of 1:20.9 at TMP with as minimal mods as possible. Right now the plan is rear brakes, upgraded rear swaybar and some new Hankook RS-3 Tires.

Image
Chris - Sales@tougetuning.com - P.905.405.0682
Tues-Fri 12-8pm, Sun. 12-8pm - 996 Westport Cres Unit 2
www.TougeTuning.com - Follow us on Facebook

Cobb|DBA|Hawk|Powerslot|Ferodo|Whiteline|Grimmspeed|TiC|Kartboy|Invidia|Swift|Motul|Rally Armor|ACT|Blouch|Injector Dynamics|Deatschwerks
Avatar de l’utilisateur
Touge Tuning
Rookie
Messages : 56
Inscription : mar. janv. 30, 2007 9:56 pm
Localisation : Toronto

Re: Touge Tuning's 2015 WRB WRX - Northstar

Message par Touge Tuning »

Well it's been a few months since the last update and I haven't had a lot of time to get stuff done on the car. The shop has been running on all cylinders but we found a little time to get some smaller things done. Previously I had installed the TiC shifter bearing and didn't notice a huge change in the shifter feel, likely due to the fact the bushing it replaces is very small and was almost new. I was actually waiting for Kartboy to finish and release their short shifter arm which was released last year and so we took some time to install it. The factory shifter feel is actually not too bad, however the throw is pretty long and I've always liked having a shorter throw. The installation of the arm is pretty straight forward replacing the original arm assembly underneath the car. We recently made a before and after video showing the throw of the shifter on a 2016 WRX which is below. Having driven my own car for months with the Kartboy short shifter I actually was surprised at the feel and length of the throw in the 2016 WRX we used in the video below. It is such a drastic difference and I don't think I would ever go back to the factory set-up.

Image


Next up I took some time to get the IAG Performance Street Air/Oil Separator installed that I had been meaning to install over the summer. With the direction injection system of the 2015+ WRX and 2014+ Forester XT it is an important upgrade to help reduce the build up around the intake ports/valves of the cylinder head. Without the port injection of the previous EJ motors there's nothing to clean the ports or valves of the oil residue so having an AOS capture the contaminants before getting into the intake system is a good idea. The IAG AOS is my personal favourite system and comes with everything needed to install and the hoses are all cut to length and the instructions are very clear. I chose to go with their dark grey powder coated version for a clean look in the engine bay. Secondly we installed the IAG EGR Delete plates which are another important modification to preventing the build up on the valves. From the installation I would say the larger problem seems to lie with the EGR system as there was only a very very small amount of oil in the TMIC and turbo to intercooler pipe. The EGR pipe however was definitely worse although much better then I've seen from others which I attribute likely to the fact I drove the car very hard this summer and it got a lot hotter then most. The EGR delete does require some codes to be turned off via the COBB AccessPORT where-as the AOS can be installed without any tuning changes. I'll still be pulling the intake manifold to do some walnut shell blasting every once in awhile to keep the engine running it's best and making maximum power.

Image
Image
Image
Image
Image
Image
Image
Image
Image
Image
Image
Image

Image


Lastly I had a beautiful Grimmspeed lightweight crank pulley to install which we threw on at the same time. The engine is definitely easier to blip/rev up making rev matching on downshifts easier. The Grimmspeed pulley is about 1/4 the weight of the factory pulley.

Image
Image
Image
Image
Chris - Sales@tougetuning.com - P.905.405.0682
Tues-Fri 12-8pm, Sun. 12-8pm - 996 Westport Cres Unit 2
www.TougeTuning.com - Follow us on Facebook

Cobb|DBA|Hawk|Powerslot|Ferodo|Whiteline|Grimmspeed|TiC|Kartboy|Invidia|Swift|Motul|Rally Armor|ACT|Blouch|Injector Dynamics|Deatschwerks
Répondre